Tuesday, 30 June 2015

ColourArte Blog Challenge!


Hi Friends! Today I am sharing a fun mixed media card I created for the ColourArte Blog challenge. We were to use some fun primary colours for this challenge, as you can see below here.
You can find all the instructions on the ColourArte Blog HERE or take a peek at their Facebook page HERE.
 
So here is my take on the challenge. I love mixed media and also have fun making cards, so I combined the two and this is what I came up with. 
I used a lot of ColourArte goodies on this, I have a complete list of them just at the bottom of the post.
 
I began with some stencils and some Sunburst Radian Rain spray, then I got out some texture paste and more stencils to add dimension. Once that was all dry, I used some Teal Zircon and had some fun splattering it here and there.
I painted the chipboard wing and hot air balloon with some twinkling H2o's in Mediterranean Blue and a Silks Acrylic Glaze in Carmen. I added some embossing powder to the wing for more texture and then added some more of the "Twinks" and Glaze on the frame, goggles, metal sentiment and number plate.

Finally I added some flowers, hot air balloon charm and some chain from my stash as some final embellishments.
 
This was a super fun challenge to do, and I understand ColourArte will be holding them on a regular basis, so count me in for next time!
thanks for stopping by today!
 
 
Other Items Used
Prima Stencil
Tim Holtz Stencil
Prima Resin and Metal Pieces
Wild Orchid Craft Flowers
Hot Air Balloon Charm from Kraftsupplies4U
 

Circus Procession for Gina's Designs Lasercuts

Hello and happy Tuesday friends! Today I would like to take you to the Circus! I had so much fun with Gina's circus shape set, and I have had this in mind to make for quite some time.

As you can see above the set comes with quite a few pieces. I have used the Ferris Wheel on a previous project which you can view HERE.
 
I was drawn to the animal cage and elephant this time, but I really wanted them to be 3 dimensional. I started off with the cage and cut a back piece, by tracing around the cage. I then cut 2 inch strips for the sides, top and back, using glue and double sided tape to create a 3D look.  I also cut off the wheel of the cage as I wanted to use some wooden spools for the wheels, which I think gave a really fun look to the piece. I papered over the whole thing after giving it a coat of black paint with some touches of silver for a metal look, and added some fun wooden circus embellishments from my stash to the top.
For the inside of the cage I fussy cut out the lion and added lots of dimensional tape to him to really make him look like he was jumping around in the cage. I added some of the Bella flourish frames to each side, and also used more of the paper, fussy cutting out some clowns and punching circles for the top corners and each of the front wheels.  I topped the cage with one of the Faux Metal Number plates and a couple of pieces of bling.
Next up is the elephant! This was super easy to do, I mixed some black and white paint to get the elephant grey colour, then added some fabric, lace and a lovely rose to her ear. I got out my rosette die and made a circus themed rosette for her to stand on, it worked perfectly!
Her finishing touch was one of the "rings" to preform in, which I again cut from the Graphic 45 paper.  I love how fun this is, and it shows the great versatility of the chipboard to be able to make these pieces 3 dimensional.
 
Thanks for stopping by today! 
 
 
Other Items Used
Graphic 45 Le Cirque Paper
Lace, Wooden Spools from My Stash
Ranger Paint Daubers
Silver Gilder's Paste
Scotty Pork Chop Embellishments
ButterBeeScraps Metal
Flowers from Kraftsupplies4U


Tuesday, 16 June 2015

Mixed Media Style Easel Card for RebeccaBaer.com


Good morning friends and happy Tuesday! Today I am sharing with you my mixed media easel card I created for RebeccaBaer.com.  I love making easel cards they are fun and easy to do. I have a step by step below here which shows you how you can make one too.

I first started off with my Gelli Plate and some bright colours of my Dylusions paints. I used a brayer to spread the paint out then layered on the Marrakech Stencil from Rebecca's Store.  After that you place your paper on top an rub the back of the paper to get your stencilled impression.
This is the impression on the paper that I got. I love the faded and mottled texture I achieved with this stencil.

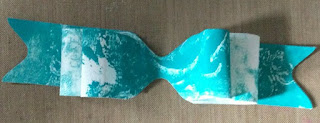
I cut the paper down to a 5 3/4'' size for the front of the card, and with the rest I decided to make a paper bow using my WRMK Envelope Punch Board.  To do this you need to cut your paper into 3 strips. One strip is 1'' x 6'', and the other 2 need to be 1'' x 5''.

 
You achieve the bow by punching  the 6'' piece at the 3'' mark on both sides, and one of 5'' strip at 2 1/2'' mark on both sides. I rounded the corners on one of the 5'' pieces and the  6'' piece and gave a dovetail cut to mimic real ribbon on the other 5'' piece.
 Next, I used my Multi Matte Medium to glue the ends of the pieces into the center, and then layered them on top of each other and below is the finished piece.

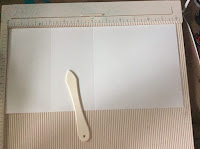
For the easel card, you will need to get out your score board and cut your card stock to 12'' long by 6'' wide. Score your piece at the 6'' and 3'' marks. Then fold at the 3'' and 6'' marks to get your easel card base.
 
Next, I cut my Gelli plate print down to 5 3/4, and a coordinating cardstock in purple to 6'' x 6'' to mat it on the card, the photo on the right shows how I will layer it.
 

 I felt the card needed a bit of sparkle, so I got out my gold texture paste and the Harlequin Damask Stencil and gave it some glam! I love how it looks, it really brightened it up.


 I glued everything down and added some colourful chipboard dragonflies and Dream sentiment in a rich purple, and some flowers for a finishing touch.
 I hope you will give these techniques a try, I love to experiment with Rebecca's Stencils.

Thanks for stopping by today!
Other Products Used
We Are Memory Keepers Envelope Punch Board
Flowers from Petaloo
Silks Acrylic Glazes
Prima Gold Crackle Texture Paste
Dylusions Paint by Dyan Reveley
Multi Medium Matte
Cardstock


Summer Fun ATC's for Gina's Designs Lasercuts

Hi friends, today I have some fun summer ATC's to share with you.  Gina custom cut me some ATC blanks, and I was totally inspired by summer when I created these.


I love the fun and colour palette of the summer! I wanted to share a little tutorial with you for this first ATC I will show you below here. I created a fun background for this ATC using the Cardstock Doily Intricates.


I started off with one of the chipboard blanks and a watercolour blank. I got out some of Gina's Cardstock doilies next, and decided to use the doilies as a stencil this time. I used some of my favorite sprays in blues and teals and white. I love these doilies, they are so versatile!


 I started off with a darker colour first then layered on some of the lighter ones, moving the doily and changing up which one I used (cuz you get lots of different ones in the package!). 
 Lastly, I used some white distress spray as the last spray to add more contrast. These doilies are so useful for stencilling and now that I have them coloured from the sprays they are ready to use on another project later
Here is my finished background. 

After the background was done I used my dragonfly stamp from Prima and embossed it with white embossing powder and used some blue ink to stamp the body of the dragonfly. I then used some Silks Acrylic Glazes on the chipboard dragonfly and added my sentiment to complete the ATC.


For the next ATC, I used the  String Along Shape Set Shells for this piece and cut it apart to make the bubbles.  I used some sticky back canvas for the background piece and played with my watercolours to make some bubbles in the background.


Once I was happy with the watercolour, I added some highlights with my white sharpie pen. For the corners of the ATC, I used some nail art, crushed shells to add texture.

For the next ATC I used the Beach Shape Set. I used my Twinkling H20's to give a "beachy" type background.

 One of my favorite things to do, is to walk along the beach collecting shells and stones for my collection, so that was my inspiration for this ATC.

I embossed the chipboard with some gold embossing powder then when that was heated up I sprinkled some Aged Ivory embossing powder from Stampendous on them. I love the texture and dimension that playing around with embossing powder gives to the chipboard pieces.

Lastly, I used some glitter and mica flakes which I adhered down with some clear glue and a little jute bow to top off the sand dollar.
I hope you have enjoyed my post today, check out all these great items in Gina's Store.
Gina's Designs Items Used
Custom Cut ATCs (Available upon request)
Other Products Used
Twinkling H2o's
Stampendous Embossing Powder
Lindy's Stamp Gang Embossing Powder
Silks Acrylic Glazes
Prima Twine
Stampendous Mica Flakes

Tuesday, 2 June 2015

Queen Bee Card for RebeccaBaer.com


Happy Tuesday friends! Today I have a fun card I created for a friend who to me is the "Queen Bee". I love the fact that Rebecca has such fun stencils in her shop and the Honeycomb Stencil worked perfectly for my first layer on my background. For this 6 x 6 card, I got out some lovely bright yellow mica spray and gave my white cardstock a once over with it to pick up on the collage style of this stencil.
Once the spray was dry, I used the Flight of Fancy stencil and some copper metallic paint to feature the bee from that stencil. I wanted them to "bee" a focal point!
After I did that this is what the background looked like. I just love those bees!
 
I wanted to add some more dimension to the card so I got out some burlap paper I had in my stash, and layered it underneath the background piece, I love how they look together.
 
Next I added more embellishements with some white ribbon and some jute trim, to pick up on the colour of the burlap. Once I had done this I taped and glued everything down to the main card piece.
 I took out my Queen Bee chipboard sentiment from Gina's Designs Lasercuts and used a black paint dauber for the words and a silver one for the crown. I added a little gold bling to the crown for some sparkle.  For the bee, which is also chipboard, I used more of the copper metallic paint and black on its wings.


The finishing touch was some flowers and now my card is complete.
I hope you have enjoyed my project today and will find your own inspiration buzzing around you!
Thanks for stopping by!
 
 
Other Items Used
Ranger Paint Daubers, Silver, Copper and Black
Radiant Rain Spray
Prima Twine
Websters Pages Paper
DCWV Burlap Paper
Flowers by Petaloo