Showing posts with label Harlequin Damask Stencil. Show all posts

Tuesday, 4 August 2015

Stencilled Zentangle ATC's for Rebecca Baer

Good morning friends, Kim here today to share with you some fun Zentangle inspired ATC's.
 
 
I had lots of fun with this project, I love making ATC's and I have been practicing doing Zentangle for a while, and thought this might be a good and easy way to help others who are new to this type of art. I thought that using layered stencils would be a fun and easy way to get the look of Zentangle but not do all the work.
 
I started off with the Artist Tool stencil and my Faber Castel black Pitt Pen and I traced around the outline of the palette.  Next, I got out the Harlequin Damask stencil, and traced out a spot I liked on the stencil into the middle of the palette. In the photo on the bottom right you can see what it looked like.
 
 
Now its time for colour. I used some Hero Arts Inks and my water brush and moved the inks around on the paper. You can see on the photo below on the right how it came out.
 
 
 I also did a second one with a different part of the Harlequin Damask stencil to achieve a different pattern on the second one.  Once I had them both coloured it was time to start the Zentangle  process. Now I am no expert, but I love how this stencil technique cut my work down to fill in the palette. I just started to doodle and fill in the blank spaces with lines, dots, squiggles and waves.


I kept going until I was happy with the outcome.


I decided to fussy cut out one of the palettes, and glue it down to some black ATC matte board. I love the look of the black for the background. 


For the second one I just trimmed down the paper and then added some tiny gemstones and a sentiment from my ATC Stash.
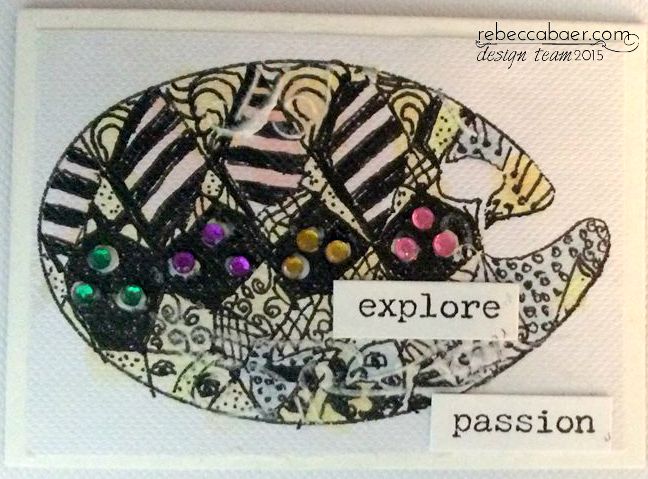
 
 
You can see the difference in contrast from the black to the white backgrounds.
 
I added some white embossing paste to this one as well, using the Artist Tool Stencil once again to add texture and some images of the brushes.
 
I hope you will give this technique a try, I really enjoyed it, and I feel its good for a beginner Zentangl-er like me to use stencils to help the process along. Remember, it doesn't have to be perfect, just have fun!
 
Thanks for stopping by and don't forget to check out Rebecca's Store and links below!


Other Products Used
Faber Castel Pitt Pen Black
Inks from Hero Arts
Pentel Water Brush
Rhinestones from my stash
Black ATC Cards from The ATC Store
Crescent Mixed Media collage ATC Cards
Ranger Multi Matte Medium


Tuesday, 7 July 2015

Mixed Media Art Journal Page for RebeccaBaer.com


Hi friends, and happy Tuesday! Today I would like to share with you a fun and colourful art journal page I created using stencils from RebeccaBaer.com
 
I started off with some paint daubers and layered on some bright colours in the background. Once that was completed I used the "All you need is love" stamp from Rebecca's Store.  After that I took the Harlequin Damask stencil and some embossing paste and added it on top.
 
Next I got out the artist tool stencil and this is a layered stencil, so you get two pieces with it. I love that you can do the bottom layer and then ad the fine lines over top of the piece.
I chose black for the palette, and then used some texture paint to mimic paint splatters. I then got some white texture paste and used the top part of the stencil to create the lines on the brushes and palette.

I chose some fun chipboard and flowers to embellish. I used some metal pieces for unusual flower centers.  After they were all attached I got out my white sharpie pen and went around some of the lines from the stencils to highlight them.

I love to art journal, it is always a fun surprise when ever you start off with a blank page, you never know where you will end up!
Thanks for stopping by today, and don't forget to check out all the great items in Rebecca's Store.
 
Rebecca Baer Items Used
 
 
Other Items Used
Metal and Clock Button from Kraftsupplies4U
Ranger Paint Daubers
Sharpie Paint Pen
Shimmerz Textures Paint


Tuesday, 16 June 2015

Mixed Media Style Easel Card for RebeccaBaer.com


Good morning friends and happy Tuesday! Today I am sharing with you my mixed media easel card I created for RebeccaBaer.com.  I love making easel cards they are fun and easy to do. I have a step by step below here which shows you how you can make one too.

I first started off with my Gelli Plate and some bright colours of my Dylusions paints. I used a brayer to spread the paint out then layered on the Marrakech Stencil from Rebecca's Store.  After that you place your paper on top an rub the back of the paper to get your stencilled impression.
This is the impression on the paper that I got. I love the faded and mottled texture I achieved with this stencil.

I cut the paper down to a 5 3/4'' size for the front of the card, and with the rest I decided to make a paper bow using my WRMK Envelope Punch Board.  To do this you need to cut your paper into 3 strips. One strip is 1'' x 6'', and the other 2 need to be 1'' x 5''.

 
You achieve the bow by punching  the 6'' piece at the 3'' mark on both sides, and one of 5'' strip at 2 1/2'' mark on both sides. I rounded the corners on one of the 5'' pieces and the  6'' piece and gave a dovetail cut to mimic real ribbon on the other 5'' piece.
 Next, I used my Multi Matte Medium to glue the ends of the pieces into the center, and then layered them on top of each other and below is the finished piece.

For the easel card, you will need to get out your score board and cut your card stock to 12'' long by 6'' wide. Score your piece at the 6'' and 3'' marks. Then fold at the 3'' and 6'' marks to get your easel card base.
 
Next, I cut my Gelli plate print down to 5 3/4, and a coordinating cardstock in purple to 6'' x 6'' to mat it on the card, the photo on the right shows how I will layer it.
 

 I felt the card needed a bit of sparkle, so I got out my gold texture paste and the Harlequin Damask Stencil and gave it some glam! I love how it looks, it really brightened it up.


 I glued everything down and added some colourful chipboard dragonflies and Dream sentiment in a rich purple, and some flowers for a finishing touch.
 I hope you will give these techniques a try, I love to experiment with Rebecca's Stencils.

Thanks for stopping by today!
Other Products Used
We Are Memory Keepers Envelope Punch Board
Flowers from Petaloo
Silks Acrylic Glazes
Prima Gold Crackle Texture Paste
Dylusions Paint by Dyan Reveley
Multi Medium Matte
Cardstock


Tuesday, 19 May 2015

Mixed Media Canvas for RebeccaBaer.com


Hello friends and happy Tuesday! Today I would like to share my mixed media canvas I created with some gorgeous Rebecca Baer Stencils.
I was in the mood for some soft pastel colours and with this canvas just kind of went with the flow and feeling of the stencils.  I started off with the Large Flight of Fancy Stencil and some of my sprays.

 Once the first layer of sprays were dry I got out some Tim Holtz tissue paper and used the Stencil Gel that Rebecca Has to put it down.  I love this stuff it works great and dries quick too!  Next I layered on the Marrakech Stencil with some more of my sprays is a light blue tone, I continued to build up the layers on the canvas until I was happy with it.
 Next it was time for some modelling paste, and I used the Heritage Flora stencil and the Flexi Spreader from Rebecca's Store.  Once that was complete I got out some chipboard for embellishments, painted them and then I wanted some texture on them, so I thought that the delicate patterns from the Graceful Harmony Stencil would work great onto of the chippys!
 You can see below how it turned out, I really love the effect and it shows just how tiny and delicate these stencils are to go on something as small as this frame and flourish. The stencil showed up great on top of the white paint and really added the dimension I was looking for.
 I used some watercolour paint in a matching colours to pick up on the dimension.
Here is a close up of the finished piece of chipboard, I love the effect!
 As I had the Graceful Harmony Stencil out I used another pattern on it for the side and one corner of the canvas. I love the delicate effect it has.
 After I was finished with the stencilling it was time to add my embellishments.  I used more chipboard wings, resin frame, metals and flowers to complete the look I was going for.

I hope you have enjoyed my project today. Rebecca has such great products in her shop, I am sure you will find something that will meet your artistic needs!

Thanks for stopping by today!


Tuesday, 21 April 2015

Art Journalling Fun with RebeccaBaer.com Stencils


Good morning friends, and happy Tuesday! Today I would like to share with you a fun art journal page I created for RebeccaBaer.com.   I am so in love with the stencils from Rebecca's Store, they are usually the first thing I reach for when I get out my art journal. 
This time I wanted to try out a fun technique I saw by Dyan Reveley who created these fun paints I just aquired. They were a perfect match with Rebecca's stencils!
I got out my trusty art journal book, and a baby wipe, and started off with this lovely turquoise background, its super easy to start your background off this way. Then it was time to get my stencils out.  I wanted to try a bit of tone on tone with them, so using the Harlequin Damask collage stencil, and the Artiste Stenciler Brush I added more of the same colour, and voila!  You can see a slightly darker shade of the same colour.  This was the beginning of my layering on my background.

Next I got out one of my favorite stamps from Rebecca's Store, The Fleur De Lis.  I used black stayzon ink and randomly stamped it around the page.
 Once the stamping was complete, I used the Dragonfly Fantasy Stencil with some different colors of the paint. Then the last layer was some white spray to give a subtle effect on top of the stencilling I had already done.  This gives further depth to your background.
 Here is where we are at now. You can see using the stencils with varying colour tones and adding the white on last you get a very deep background full of lovely layers.  The first colours added fade more into the background and the white pops more as the top layer.
 Now here I had a little bit of a brain storm!  I was getting out some of my masking tape from Rebecca's Masking Tape Set, and I thought the colour of it was a perfect match with the tones in my background.  So, I decided to use it as kind of a washi tape in my background to anchor my embellishments I wanted to go in this area. It worked out great!
 After I had layered on the tape, I used a chipboard heart, added more of the Dragonfly Fantasy stencil in white and then added some paper strips for dimension.  I then grabbed some white bloom flowers from my stash and added sprays and purple alchohol inks to pick up on the colours in the background.
 With a few finishing touches with my white sharpie pen, and a lovely quote from Walt Whitman, my page was complete.  Here is the final result below.
I have really discovered a love for art journalling, and Rebecca's stencils and products have really come in handy for this, they make it so easy to create a mini masterpiece!
Thanks so much for stopping by today and don't forget to check out Rebecca's Store.


Other Items Used
Dylusions Paint
White Sharpie Marker
Cracked Pistachio Distress Spray
Ranger Purple Alchol Ink
Chipboard Heart from Gina's Designs
White Bloom Flowers, Acrylic Hearts & Script Stamp From My Stash