Monday, 27 June 2016

Altered Photo Frame For The Prima PPP Challenge

 
 Hello friends! I am so excited to try out this months Prima PPP Challenge over on the Prima Blog.


This month the colours of the PPP are playing off of Pantone's colors of the year, of which there are two this year. You can see below the colour story for which I took my inspiration for this project.
 
 
Let's get started with my photos and how I created my project!
I started off with a simple wooden frame which I got from Michaels.
 
 I am using the Prima French Riviera paper line for this project as well and lots of other gorgeous Prima goodies!


I cut three different papers to fit over the frame, distressing them and then inking them up with Prima's chalk edgers.  Once that was completed, I glued the papers down to the frame.
 
 
I used my tried and true Prima script stamp (that I have had for ages!) and added some inky script to the frame. 
Then, it was time to work on my embellishments. I am using lots of the IOD moulds that I made using some Prima air dry clay. I painted the pieces with some of the Finnabar Art Alchemy paints in blue-gold and brass hardware, in keeping with the colour tones of the mood board.

 
 I love how the IOD moulds came out, they are my new favorite thing to play with!
Next, I got out my Fairy Belle vine flowers and gave them a coat of gesso to lighten up the green leaves. I also sprayed some water on them after the gesso was dry and then added more of the Art Alchemy paints to them to pick up on the colours.
 
 
Now it was time to play with my Art Stones! I used the same Brass Hardware paint and painted the stones, mixing them up until I was happy with the coverage.

 
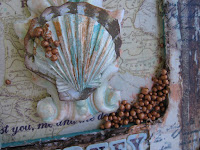
I added the stones to some spots on the frame, after I glued down my embellishments. I used lots of Prima goodies on my frame, including the Sea Shells from the Shabby Chic Treasures, and some Prima Mechanicals as well.
 
 
I also added lots of gorgeous Prima Flowers too! I touched them up with some of the painted Art Stones, and also gave them a spritz with water and some Caramel Alcohol Inks to bring out the centers of the flowers. Thanks to Prima Designer Miranda Edney for that tip! I saw her do it on a Live with Prima Class, and I just love how the flowers came out!


I added some pearls from my stash and wound them in and around the embellishments, adding some Aqua Alcohol Ink and spritzing with water as I went.
 
 
Another of the gorgeous IOD Moulds!


....And again here is a look at the finished product! I also did add some letters from the paper line to spell out "Journey" on the frame.


I hope you have enjoyed my project today. I had so much fun with the Prima PPP challenge!! I hope you will pop over to the Prima Blog and check out the monthly challenges they have over there.
Thanks so much for stopping by!


Tuesday, 21 June 2016

ATC Challenge Fernli Designs DT

 
Hello friends! Today I am sharing my ATC Tray and 6 ATC's made from Fernli Designs.
Fernli has a challenge up on their Facebook page right now, that goes on all year long.
 
You can find the ATC Tray with Blanks HERE that I used for this project.
Here is a photo of the blank tray and ATC's.
 
 
I started off the tray by giving it an all over coat of gesso, then applied my blue chalk paint. I used some paper from my stash for the back ground and then glued the pieces together. It was simple and very easy to do.
 

The ATC blanks are made with sturdy mdf wood and are also fun and easy to alter. I did a variety of techniques on mine. That is the fun with ATC's you can make them anyway you like, just trust in your artistic flow and create what makes you happy.
 
I papered this ATC and then added some script stamp to it before adding some Prima Art Alchemy paints in turquoise and lime green. I added water to the paints to make them run and then used a stencil for the floral motif in the centre. I added some embossing powder to the top of that while the paint was wet and hit it with my heat gun. Some metal and embellishments finished it off.
 

This ATC is on sticky back canvas, I applied a similar technique to this one, but fussy cut out some roses and added the micro beads for dimension.


 I think this ATC might be my favorite, it is done on watercolour paper with alcohol inks, white Staz On ink with script stamp for the background. I used some of the Prima IOD molds for my main piece in the center. I added a glass cabochon, flowers and micro beads to finish it off.
 
 
This ATC was pretty simple to do, just a vintage image, some stamping, lace, bling and a lovely Fernli corner!


Here are a couple more of my ATC's I created. Each month I will share my new ATC to add to the ATC tray.
 
I added lots of pink sparkle on this one!

I used a Fernli wing and some hearts on this one!


I hope you will check out the challenge on the Fernli Designs Facebook group, they have other challenges as well, and its such a fun group to join in.
Thanks so much for stopping by today!


Saturday, 18 June 2016

Altered Paint Brush Shabby is Chic Boutique DT Project

Good morning friends! Kim here today to share with you my shabby altered paint brush, made with lots of gorgeous goodies from Shabby is Chic Boutique Store on Facebook.
 
 
 I started this brush off with a coat of gesso all over then got out some Prima Art Alchemy Paints. These paints have lots of shimmer to them so they are perfect for any shabby project.
 
 
 I used lots of muted tones to go with my SCB laces, trims and bling.


 Next, I used my script stamp, also from Prima, and some black StazOn Ink, and stamped all over the brush. Then it was time to start layering on my lovely laces and trims from SCB.
 
 
I used a wooden wing from Fernli Designs and some resin pieces, along with the gorgeous pink tulle trim from Shabby is Chic Boutique. I added an SCB button and tiny doily to the top of the brush to add interest.
 

Below here you can see I used lots of pink laces and trims the brush. Some flowers and SCB bling added some sparkle to the piece.


I used more of the Art Alchemy paints once I had layered on the laces, and embellishments to make them look like they had been splattered in paint. A final touch was some Prima Art Stones to add dimension to the brush.
 
 
I hope you will try some mixed media with your items from Shabby is Chic Boutique, its the best of both worlds!
 
 
Thanks for stopping by today, and please check out Shabby is Chic Boutique on Facebook.
Have a great day!

Friday, 17 June 2016

Stamping Fun and Cardmaking with Joggles Design Team

Good morning Joggles fans! I am very excited to share this months project with you. This month I am featuring stamps from Joggles. I am an avid stamper, and these stamps are just amazing, and stamp very clear and sharp images. I have made a couple of cards so lets get started!
 
 
Here is a list of supplies you will need.
 
 
Other Supplies
Coloured Card Stock of Your Choice
Ribbon or Twine
Embellishments for decoration
Gems
Glue
Joggles Twinkling H20's -Guatamalan, Sunflower,Wisteria, Key Lime
Sharpie White Marker
Stickles
Your Choice Coloured Inks
Dimensional Tape
Stickles in Crushed Pineapple
Spiced Marmalade
 
On to the cards now! First is a fun card with The Bird Ernest Stamp. I love this little guy, he is so friendly looking. I used my black StazOn Ink to stamp him then I got out my Twinkling H20's and gave him a water colour look.


I used a fine brush for his beak and little feet, and used the Sunflower colour to make them a lovely sparkly yellow tone.
 
 
For his body, I did a mixture of two colours. Don't be afraid to mix colours when working with water colours, they will blend nicely with the water, just have fun and play! I used the Guatamalan and Lime tones for this body and the Wisteria for his chest.

 
Once little Ernest was dry, I cut him out of the cardstock and set him aside to dry. Now it was time to get my back ground done. I chose some lighter tones of inks to stamp the background, using the Tropical Re-Leaf stamp from Joggles. I really love this stamp, its very airy and ethereal looking.

 
I used various soft colours, in pink, pale blue, and yellow, and matched the background cardstock to the yellow ink.

 
I also cut a band in the yellow, and used the Message in a Bubble Believe stamp on top of it. Next, it was time to get Earnest out and add some dimensional tape to the back of him so he stands out on the card.

 
For some final touches I added some gems from my stash....
 
 
.....and some fun ribbon, twine bow and flowers to finish the card off.


Here is the finished card. I love how it turned out!

 
I also created a second card using lots of Joggles stamps. I started this one off by using some Distress Inks in Abandoned Coral and Spiced Marmalade.  I cut out a circle for the moon, and added some glue dots to stick it down temporarily. I used the inks all over the card until I was happy with the colour, then used my stamps to create a scene on top.
 
 
I used some Crushed Pineapple stickles for some glitter, and coloured the moon yellow with my alcohol markers. For a final touch, I added some white dots to the house, flowers and leaves and a bit of twine and a metal key.
 
Its so fun to play around with Joggles Stamps, let your imagination be your guide!
I hope you have enjoyed my cards today and please check out all the great items Joggles has in stock!
Thanks for stopping by!