Showing posts with label Die Cutting. Show all posts

Wednesday, 6 January 2016

Laura's Loft DT Casual Friday New Releases!!

http://lauras-loft-shop.myshopify.com/


 Hello friends, Kim here today and I am excited to share my Card featuring Casual CAS-ual Fridays Stamps​ and Dies. We are celebrating Valentines Day and CAS-ual Fridays new releases today over at Laura's Loft ! For this card I used the Curtis back ground Stamp and the Tag Buddies Dies.

Using some Hero Arts Shadow in the mid tone colour range. I used a pretty bubble gum pink on some pink card stock to give a tone on tone effect to the background.

 
Once I had let the ink dry I used some dimensional foam tape to pop the card up and give it some height. Now its time for some die cutting!

For the first layer I used the largest die from the set and some white vellum paper so that you could see the background through the vellum. 

 
I then used some of My Favorite Things paper and the next size of the die, keeping it all with in the pink tones for Valentines Day. I used some multi matte medium to tack it down on the cardstock.


Once the card was assembled, it was time to get out some of my favorite embossing powder. I used the Ho Ho Ho, Wow! Embossing Powder for the wooden heart in the centre.  It really added a lot of sparkle. Laura has a huge selection of Wow Embossing Powders in her shop you can check them all out HERE


 I also used the Hopes Desire Sequin Pack, and added some of the sequins and doves from the pack to add interest to the card.

I added a final touch of a metal number plate from Tim Holtz and some bakers twine and that finished up the card!

Thanks so much for taking a look at my project today. Don't forget to check out all the great items in the Laura's Loft Store and Blog
You can find out more info about the CAS-ual Friday new releases on Laura's Blog
HERE
Other Items Used
Versamark Clear Ink
Hero Arts Bubble Gum Ink
Tim Holtz Metal
Red Bakers Twine
My Favorite Things Paper
Vellum

Friday, 18 December 2015

Winter Heart Card And Tag Duo A DT Project for The Crafter's Palette

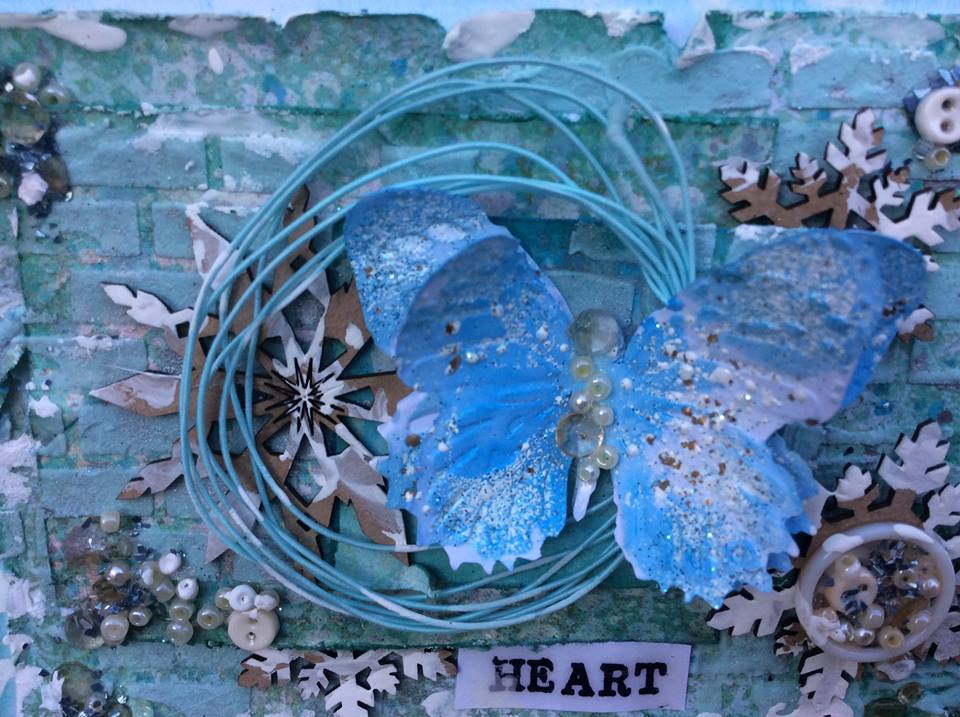
Good morning friends! Today I am sharing a fun and wintery project for The Crafters' Palette DT.  I created this card and tag set for a friend as part of her Christmas gift, in some shabby blue tones complete with die cut butterflies.


I was inspired by this beautiful Texture Fades die set by Sizzix, it comes with the die and also the embossing folder so you can create dimension on the butterflies as well. 


I die cut out the butterflies and then ran them thru the embossing folder.  Next I took my Distress Inks and created a watercolour effect with them by stamping them down on my craft mat and spritzing them with my Mist Its bottle


I used a small paint brush to dab the watercolour on the butterflies, making sure to get it in the raised areas. While the butterflies were wet, I sprinkled on some of the Frantage Shabby Blue Embossing Powder and heat set them.


I used more of the Distress Inks on the edges of the paper, tag I created and the edges of the card.


Next I used some embossing paste, (but you can use any type of texture paste for this, Crafters' Palette has a good range in their shop) and mixed it with some mica powder in a sky blue colour.


 Now that I had all my parts and pieces are ready, it was time to assemble and add my texture. I used some Christmas themed paper I had in my stash from last year, gave it the same watercolour treatment I gave the butterflies and then used my brick stencil to add the coloured texture paste.

 I assembled my card first using double sided tape on the paper layers, and using multi medium matte to glue down the butterflies, wire thread from Prima, and snowflakes. I layered each element on top of each other to give lots of texture to the card.  Next, I got out some buttons, tiny beads and my Glossy Accents and added them to my card for further interest and dimension. I layered a button on top of my chipboard snowflake and filled it with the glossy accents and put all my tiny beads inside.


I assembled the tag in much the same manner, and added a final touch of gesso around the card and tag to give a wintery feel to them both.


Here is my completed card and tag duo! 
Thanks so much for stopping by today, and don't forget to check out The Crafters' Palette Blog to keep up with all the new things the team is up to!


Tuesday, 20 October 2015

Rebecca Baer Design Team Hello Card


Good morning and happy Tuesday! Today I have a fun and easy card to share with you featuring the Diamond Weave Petite Stencil from Rebecca Baer.
 
 
At first glance, this card may seem like its a lot of work but I can assure you in a few simple steps you can make a card that will look like you took hours to make!
This is a 5 1/2 x 4 1/4 card.
 

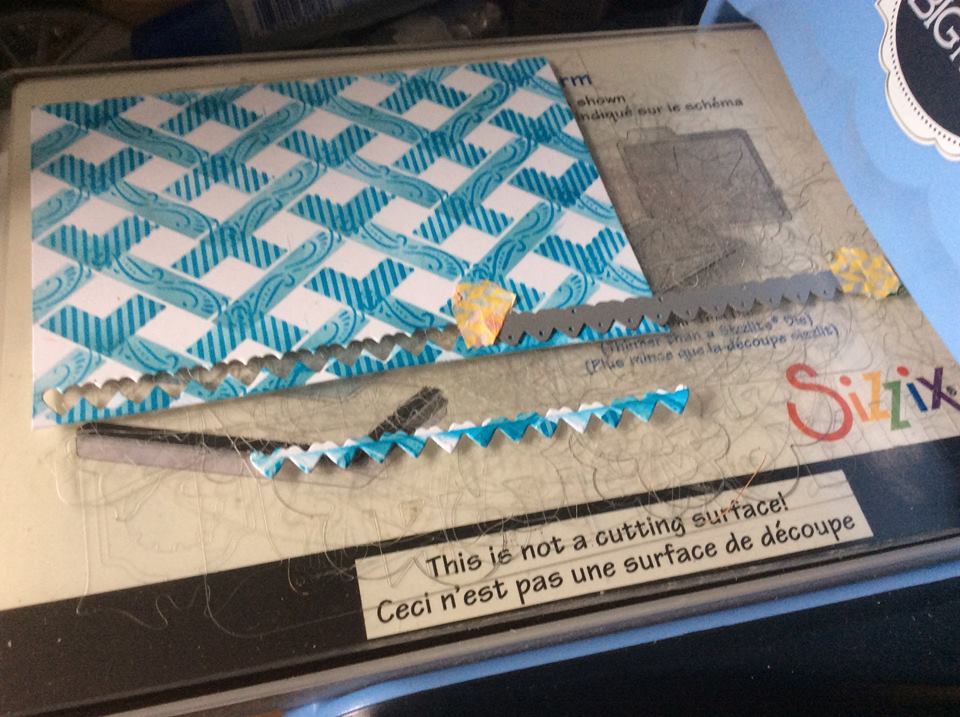
 The first step was getting out the diamond weave stencil and my distress inks.  This stencil is great and you can get so many different designs from it, I just started on one side of the card and worked my way over to the other side. Overlapping the stencil gave a lattice look which I was really please with.

 
The next step is to take a darker Distress Ink in the same colour family and use the lattice part with the flourishes and lines on. Again starting at one side and working your way over gently put your ink on and the impression will be on top of the lighter coloured lattice.


After I was finished with the stencilling, I got out my heart die and ran it through my Big Kick to create a row of hearts across the lower part of the cardstock.
 

I used the same die cut to cut out some more hearts in some fun colours.  I cut the hearts into pieces and added two at a time and created a row across the lower part of the card with the die cuts insetting them in to the part I cut out.


I also used a fun Hello die from Spellbinders and die cut that three times so I could layer the die cuts in a staggered pattern to create dimension. Now its time to put it all together.


You can see here a close up of the hearts, and also the Hello sentiment, I love the staggered look of the die against the lovely lattice background.


I mounted it on some navy card stock, and added a few fun sequins for finishing touches.


I hope you have enjoyed my card today, remember to check out all the fun  items in Rebecca's Store and also the DT blog as well.
Thanks for stopping by!
 
Rebecca Baer Stencil Used
 
Other Items Used
Spellbinders Hello Die
Paper Smooches Heart die
Recollections Card Stock
Distress Ink From Ranger

Tuesday, 6 October 2015

My Friend Owl A Rebecca Baer DT Project


Good morning friends and happy Tuesday. Kim here today to share with you a fun card project using the Petite Diamond Plaid stencil from Rebecca Baer. I created this 4 1/2 x 5 1/2'' card using white card stock as the base. 
 I love fall, and was inspired by the season, but also by a dear friend who loves green and owls. I will be sending this card to her for a little thank you. I started off with white card stock and die cut a leaf image out of the blank card, I set it aside to use later.
 
I started off with layering on the Petite Diamond Plaid stencil. This stencil comes with three layers. I love working with layers it gives such a great opportunity for dimension and colour.  There is no right or wrong way to layer up this stencil so I just laid one on top of the other, using my Distress Inks in  three different tones.
Once the plaid design was achieved. I got the die cut leaf out and stamped and inked up a cute little owl. I added some stamped pine cones in the background as well.
 
 
I popped up the plaid piece with black foam tape and mounted it on some chestnut brown card stock from Recollections. Once the plaid piece was in place I used score tape to tape down the leaf and inserted it into the card. By layering on the plaid and not the leaf it gave it some more dimension to the card.
 
Lastly I die cut out the word friend and added some bakers twine and a small flower embellishment.


 Here is the finished product! I love how it came out, and this stencil is fun and versatile, so watch for me to use it again soon, it has become one of my favorites!
 
I hope you enjoyed my project today and will check out all the great items in Rebecca's Store and also the DT blog as well.
Thanks for stopping by!
 
Rebecca Baer Products Used
 
Petite Diamond Plaid Stencil
 
Other Items Used
Cardstock from Recollections
Inkadinkadoo Owl Stamp
Paper Smooches Friend Die
Recollections Flowers
Spectrum Noir Markers
Distress Inks
Kool Tak Black Foam Adhesive


Tuesday, 15 September 2015

How To Create a Stenciled Window Die Cut Card for Rebecca Baer Design Team

Hi friends, today I have a fun die cut window card to share with you all.  This was my first try at creating a window card, but I am please with the results. I hope you will be too!  I was totally inspired by Jennifer McGuire on this project, I have posted a link to her inspiration video at the bottom of the post.
 
I created this 4 1/2 x 5 1/2'' card using white card stock as the base. I got out the Flight of Fancy Stencil from Rebecca's Store and the larger Artiste Stenciler Brush to apply my Distress inks.
 
 
I taped down the stencil with the RB Mini Masking Tape to ensure that my stencil wouldn't move as I wanted a nice crisp image.   I applied several layers of the ink and
 
 
Once that was completed it was time to die cut. I used my inked piece and used more of the RB Masking Tape to hold down my die, (this stuff is invaluable to me now, I just love it) and ran it through my Big Kick.
 
 
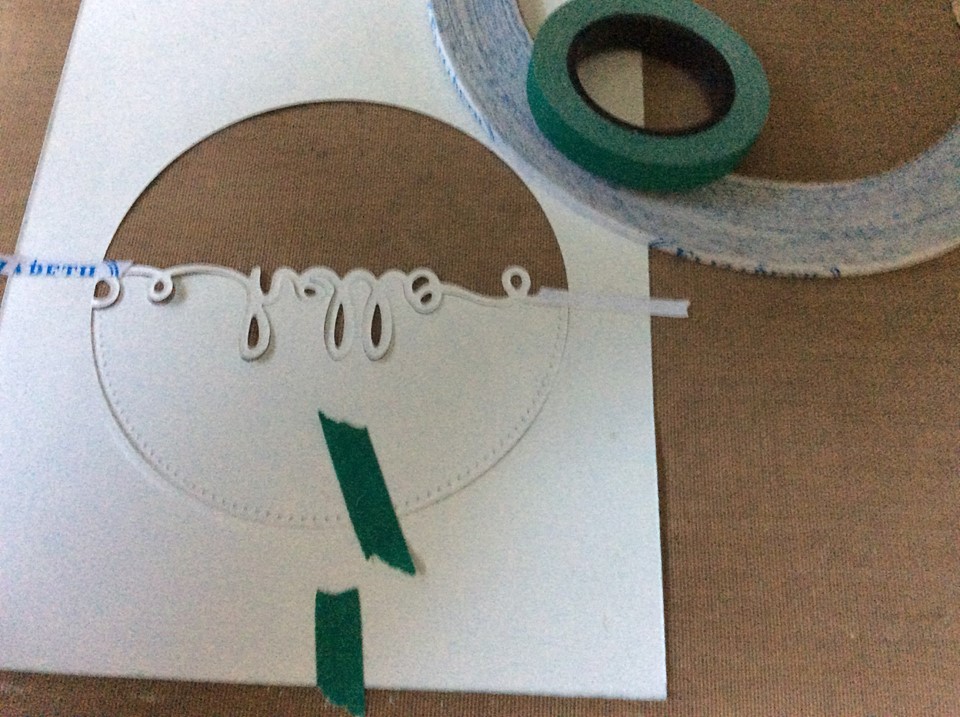
I cut out the circle first with my circular die and then cut the word out of the circle, I just found it easier this way.
 
 
Once I had the circle and the word cut out, I used more of the tape to hold the top half of the circle in place and then attached the word across the middle of the tape. I wanted to make sure I had the pattern lined up on the card as well so it was an easy way to ensure I had the word lined up.
 
 
 Now that this part was ready I added some foam tape to pop this part of the card up and set it aside.


Once that was completed I got out my second piece of card stock and used my embossing paste and the same stencil to create some texture on it.
 
 
I lined up the patterns from the embossing paste card and the Inked up card to ensure the patterns matched, I wanted it to look like one continuous pattern on the card. The die cut hello just floats nicely in the middle, I added a tiny bit of clear foam tape for some stability on the back of it, and some silver sequins to finish it off.


This card does have a lot of steps to it, but I felt it was worth it for the fun look I got.

 
Also, this card created an extra circle die cut, and I used it and the tiny die cut pieces to create a small note card to go along with this card.

 
I hope you enjoyed my project today and will check out all the great items in Rebecca's Store and also the DT blog as well.
Thanks for stopping by!


Other Items Used
Evergreen Bough Distress Ink
Sizzix Hello Die
Die-Versions Circle Die
Wendy Vecchi Embossing Paste
Doodle Bug Designs Sequins
Big Kick Machine
 
Jennifer McGuire's Inspiration Video