Thursday, 26 January 2017

Cute As A Button ScraPerfect DT

Hello ScraPerfect fans! Kim here today with a simple and easy Valentine project for you.
 
 
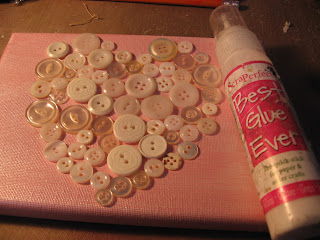
I started off with a 4 x 5 inch canvas that I painted with some Prima Art Alchemy Paint in Pink.


I love this paint, its is iridescent and gives a lovely shine to the canvas.

 
Next, I drew a half of a heart on a piece of paper, and cut it out.

 
Now I have a template for my canvas. I drew around it with a light pencil line, so I would be able to see where to put the buttons and keep the heart shape on the canvas.

 
Now its time for the Best Glue Ever. I used the glue to stick down my buttons, but first I laid them all out so I was happy with the pattern.


Once the buttons were glued down, I added some flat back trim in pink around the buttons to frame it and make the heart stand out.
 
 
I added a small organza bow to the top and a small ribbon rose finished it off nicely.
 
Now it is time to get out my favorite ScraPerfect product...these gorgeous Transfer Foils! I love using these in a variety of ways, and this was a good opportunity to use them.


I am also using some of the Christine Adolph Rub ons for the foils, they are a sticky adhesive that the foils stick to great.

 
I wanted to add a little tag to the side of the heart so I cut it out of white cardstock and punched a hole in the paper. I used the "XO" sentiment from the rub on pack and used the red foil to rub on to it.


I tied some jute twine to the tag and glued it on the canvas.


Here is the finished canvas. It is a very quick and easy project all with the help from ScraPerfect.
 
 
I hope you have found some inspiration here today and will check out all the great items in the
ScraPerfect Store.
Thanks for stopping by!

Wednesday, 25 January 2017

Shabby Chic Wall Hanging for Shabby is Chic Boutique

 
Good morning friends, Kim here today with my next project for Shabby is Chic Boutique on Zibbet.
This time I have altered a Kaisercraft piece, that is a wooden fence and butterfly.
 
 
The first thing I did to this project was give it a coat of gesso, then a coat of Martha Stewart Putty. After the paint was dry, I used some crackle medium on top and then finally a coat of white paint to make it crackle.  I then used my Prima distress tool over top of that, to give it a worn and vintage look.
 
 
Once I was finished distressing the fence, it was time to layer on the laces. I started with some of the gorgeous fringe trim from SCB at the bottom. Then layered on some vintage laces from my stash until I was happy with it.


I also needed to alter the wooden butterfly that came with the fence. I used material first on the butterfly then layered on some laces and trims from SCB.  For the center of the butterfly, I used a large rosette trim piece and a gorgeous piece of bling that was gifted to me.


I also added some  fibers and seam binding from SCB, and flat back pearl to the center of the bow.
 
 
This smaller butterfly is from my stash, and I back it with felt to make it stand up on the fence, and added some flat back pearls and vintage bridal trim to it to finish it off.
 
 
I added more laces and topped them off with some of the gorgeous bling you can find in the SCB Store!


I added some vintage pearls from my stash to add texture and dimension to the piece.


And once again here is the final look!
 
Thank you so much for stopping by!


Thursday, 12 January 2017

Fairy Carousel A ScraPerfect DT Project

 
Good morning ScraPerfect fans, Kim here with my next DT project!
This time I have created a fairy carousel!

 
I am using the Best Glue Ever and some gorgeous paper called Fairy Belle by Prima.
 
 
I have had this chipboard carousel in my stash for quite a while, and decided it was the perfect time to use it. I adhered all the chipboard with the Best Glue Ever, and it worked out so great and gave a good strong hold to assemble the pieces. There are three sides to this piece.
 
 
As you can see this carousel comes with a lazy Susan type spinner to attach to the bottom. I did adhere the spinner with some BGE, but I also added some hot glue for a more instant hold as well.

 
I painted the box first with gesso, then with a lovely colour from Martha Stewart, called Putty. Now it is time once again to get the Best Glue Ever out for adhering the paper.

 
I love this glue for paper!! It holds so well, really its one of "the best glue's ever" for paper crafting. ;)

 
Once the paper was on, it was time to embellish. I am using lots of different things I have had in my stash for a while. Flowers, resin pieces, lots of lovely laces and more goodies I rummaged through my craft drawers and found.

 
I decorated each section a little bit differently.


Once I was happy with the box part, I painted up some chipboard from my stash with some of my favorite paints from Prima.

 
Now its time for the Best Glue Ever to come back out. Can you see why I love this stuff?? I use it for so much!

 
I wanted the top of the box to have some sparkle, cuz what is a fairy scene with out glitter? So BGE to the rescue! I put small amounts in various places around the top of the box, like on the wings and in the corners.

 
I then sprinkled on some frosty glitter, and I love the effect!


I continued to add more embellishments and gave them a little coat of Diamond Stickles for more sparkle and shine.


I added some pearls from my stash and of course added more Stickles to them as well.


Once again here is the final look!


I hope you have found some inspiration here today, and will stop by the ScraPerfect Store!
 
Thanks so much for stopping by!