Monday, 10 October 2016

Fernli Witchy Tag DT Project for Fernli Designs

 
Hello Fernli Designs fans! Kim here today to share with you my next design team project for Fernli Designs. I am really in Halloween mode, and all the amazing products in the Fernli Shop, have helped me to get into the spirit!
 
This time I have created a giant tag/wall hanging for my door, so everyone knows a little witchy magic is afoot!
 
 
I started off with one of the 2mm Giant Tags. I love these tags so much, they are one of my favorite things to work with. I also got out some of the leaves from the Flower and Leaf mix set and the String Swirl. I also found a fun image of a lovely Victorian lady in some gorgeous autumn colours and also a little witchy hat for her to wear.
 
 
I took my paper pieces and glued them on to some black card stock to make them stand out more and give them some more stability. Once the glue was dry, I fussy cut out the ones I needed for this project.


Next, I put a coat of gesso on all the wooden pieces and once that was dry, started to layer on some paints in Autumn tones, like orange, bronze, copper and brown. I used a variety of paints from my stash for this.
 
 
Once the pieces had the desired colour to them, I got out some Silks Acrylic Glazes and give them a coat in a colour called Autumn Leaf. I did this on the tag as well.
 
 
Once the paint was dry on the tag, I got out some gold embossing powder, and sprinkled it on the tag and gently heat embossed it. This gave the tag a nice texture and sparkle.
 
 
Once I was finished with the embossing powder, I got out some vintage music paper and glued it down on top for even more texture.
 
 
Once the glue was dry, I got out more of my paints and did a dry brushing on top of the paper to make it look old and distressed. When that paint was dry, it was time to glue my witchy lady down. I put her on first, then placed the hat on her head.


I gave the String Swirl the same treatment as the tag, first a mixture of paints and then some of the gold embossing powder.


I then glued my sentiment on top of the swirl and added some trims to my tag as well.
 
 
I placed the leaves, some flowers from my stash and a distressed bottle cap on the left side of the tag for interest.


I added some brown seam binding to the top of the tag, and some gold trims to the side. This finished  off the piece nicely.
 
 
I hope you will give one of these giant tags a try. I love creating with them, and really the sky is the limit, you can put anything you like on them.
Thanks so much for stopping by today!
 
 
Fernil Designs Products Used


Thursday, 6 October 2016

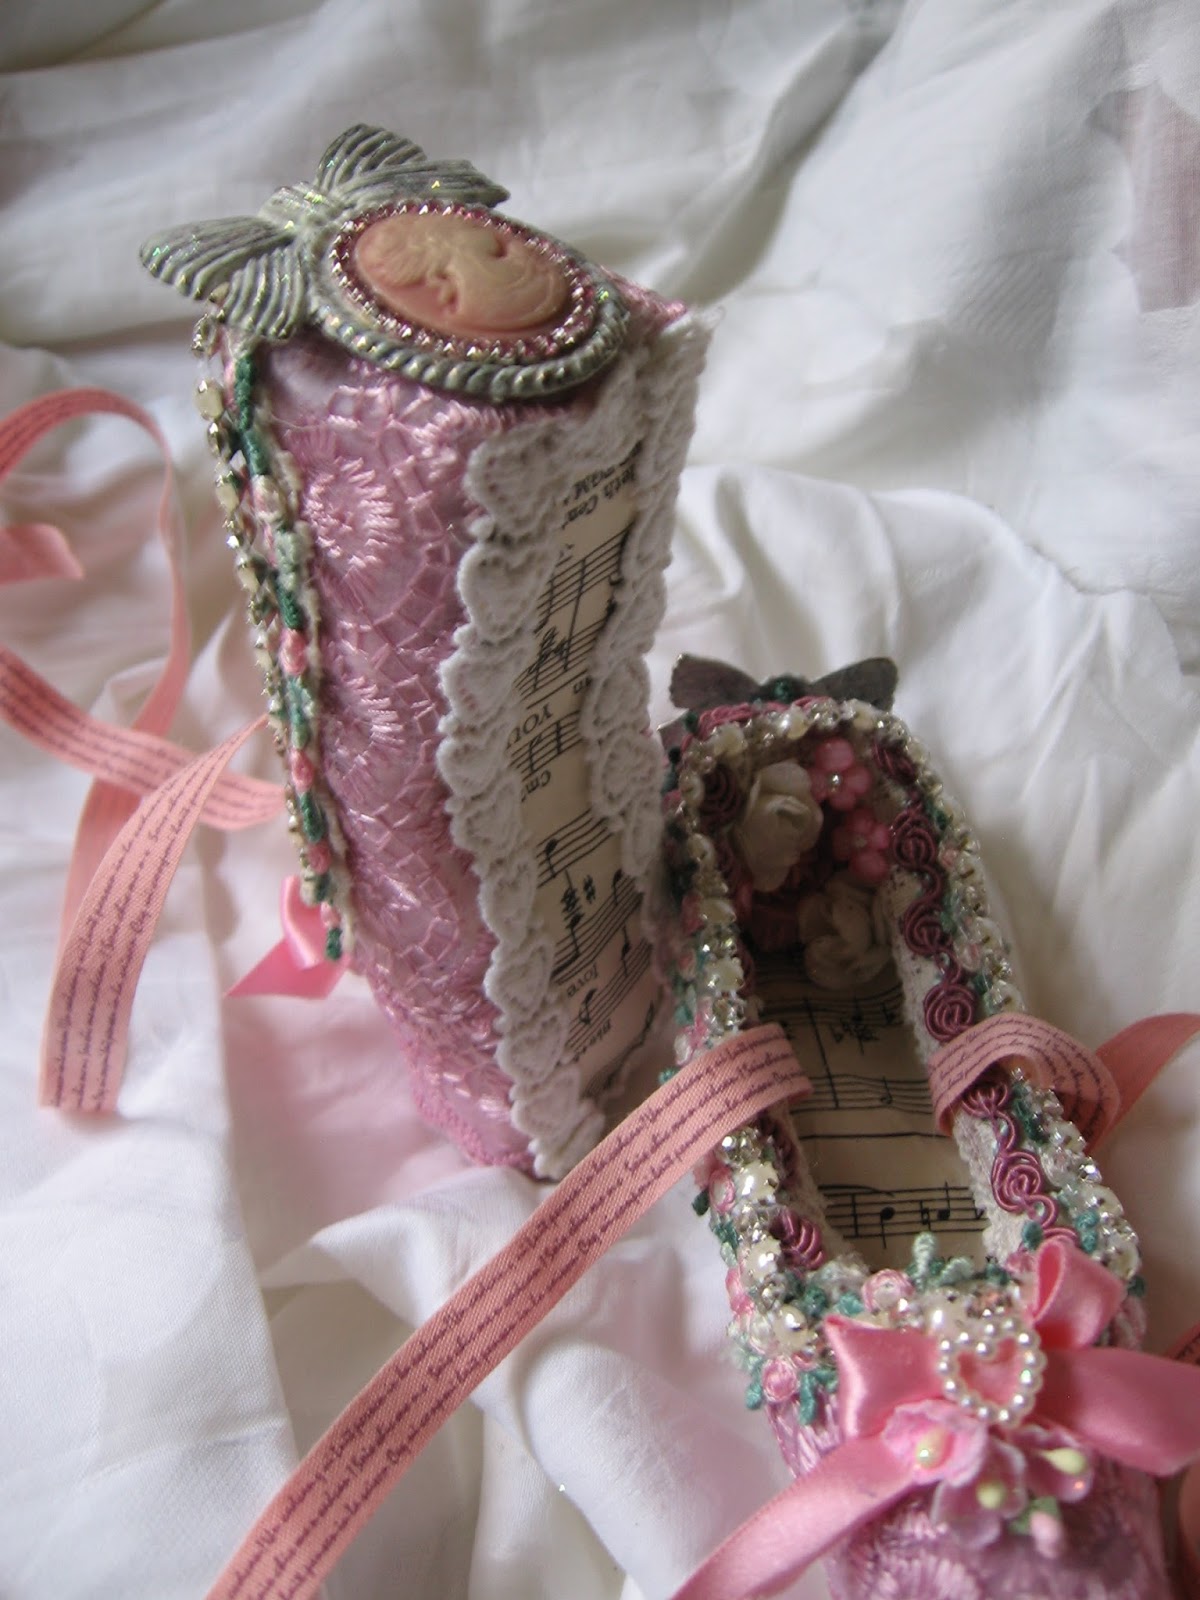
Dancing Queen Ballet Shoes A Shabby is Chic Boutique DT Project

Good morning friends, Kim here today with my next design team project for Shabby is Chic Boutique on Zibbet.  I am excited to share this project, as I have created some ballet shoes out of toilet tissue rolls. This is a fun and easy project anyone can do, so lets get started!
 
 
I cut down one roll, then another roll to add some length to the top and bottom of the shoe. After I added the length, I flattened out the roll and cut a long oval shape into the roll for the spot where her foot would go.  I used a combination of double sided tape and Beacon 3 in 1 glue to hold the shoe into place.
 
 
Once all the glue was dry, I used some vintage music paper for the inside and soles of the shoes. Then it was time to add some gorgeous SCB laces, trims and doodads to embellish the shoes.
 
 
I did give the shoes a coat of pink paint as well, then I layered on some of this gorgeous pink embroidered lace all over both of the shoes. I used some pink satin ribbon, millenary flowers and a tiny pearl heart to finish off the toe of the shoes.
 
 
I added one of the SCB cameos to the back of the shoe, which I added to a metal backing for dimension. I also used some of the cup chain from the shop, which I altered with pink alcohol ink from Ranger to colour coordinate it with the shoe.
 
 
I added some of the white heart lace to the bottom sole of the shoe to give it a nice finished edge.


 I also added some of the pink script ribbon for her shoe ties and also some of my favorite trim, the pink rose embroidered trim around the top of the shoe. You can also see inside the shoe in the photo above, where I added some flowers and doo dads from my stash peeking out in the heel area.


I added some of the SCB rhinestone and pearl trim to the top of the show as well, for a finishing touch. I am very happy with my ballet shoes, and as you can see they even stand up on their own too!


I do plan on making another pair of these, and will have a step by step tutorial in the near future for you!


Thanks for stopping by today, I hope you will make a pair of these lovely shoes yourself.
Please check out all the gorgeous items in the Shabby is Chic Boutique store on Zibbet.
You can also find more info about this project on my blog


Saturday, 1 October 2016

Witchy Work Table A Fernli Designs DT Project

 
 Good morning Fernli Designs fans! I am so thrilled to be doing some more design team work for Fernli Designs. I love their products and this time I have made a fun and whimsical Witchy Work Table!
 
 
I have a lot of parts to this project, so lets get started!
I am using this wooden plaque from Fernli Designs as my table base. I am also using lots of scroll corners and flourishes. I will have a complete list of the items at the end of this post.
My first job was to paint everything black, as what other colour would a Witchy table be?


Once all the black paint was dry, I used some Prima clear crackle paste on top of the paint, and when that was dry, I went over it with some silver Gilder's Paste to pick up on the cracks and grooves in the wood.
 
 
I attached the corners type 5 and the curly swirl to the table to work as legs and they worked out perfectly! The table was even and stood up straight. These make perfect table legs.
 
 
Once the table was together, I set it aside for a bit, and began to work on my pieces that would go on the table. First up is the Witches hat. No Witch can be with out this! I used air dry clay to make the hat and the pumpkins for my table. It was easy to create the shapes, and I let them all dry over night to make sure they were sturdy enough to paint the next day.


I painted the hat black (of course) and added a twine braid and black flower to finish it off. I also added a bit of the silver Gilder's Paste to pick up on the cracks in the hat and make it feel a bit old and worn. 
 
For the pumpkins, I rolled them out into balls, added some lines for the grooves in the pumpkin and rolled out a stem and made some leaves.


When the pumpkins were dry, I painted them black and then dry brushed on some orange paint for the pumpkin and green for the stems and leaves. I am pretty happy with how they came out!


I needed to make a hat stand for my Witchy hat, so I cut a small dowel down and added some of the small Fernli corners. These corners were from a mixed bag of Fernli Goodies, and can be available upon request. These worked out great for a hat stand.


I glued the hat on to the stand and then glued the stand on to the table.
 
 
Next, I decided to make a Book of Shadows for my Witch. I created this mini book much the same way you would create a mini album.  I cut up some old book paper for the pages in the book, and added some hot glue to the outside of the book for a cob web effect, adding more of the silver Gilder's paste to make it look old. Some tiny moon and stars stickers and a date finished off the outside.


I added some cheesecloth, that I sprayed orange to give a spooky effect on the top of the table, and began to add the rest of my elements to the table.
I made a "crystal" ball out of a bottle cap, silver bead cap and large pearl. I used some Stickles all over the pearl to make it appear like it was shimmering.  For the black candles, I cut up a hot glue stick and heated up one end until I could make a glue string coming off of it, it make it look like the wick of the candle.
 

I glued down my finished pumpkins to the table, and rolled up more of the vintage book paper to look like scrolls.


I used the Decorative Panel 1 for the back of the table to hold up the book. I added a Tim Holtz Skeleton and gave him some spooky orange gems for eyes.
 
I also added a Prima Relics and Artifacts small doll to the table and gave it a bit of a creepy make over with green paint, red fangs, and yellow eyes.

 
My finishing touch was some spider webs. This was achieved with very slim glue strings using a hot glue gun. I ran the strings all over the table. Once the strings were dry, I used some Diamond Stickles from Ranger and ran a tiny bead of that over all the strings. This gave the faux webs a sparkly effect which I love!


I had so much fun with this project! I am so thrilled with how it came out!
 

I hope you have found some inspiration here today and will give a project like this a try.
Fernli Designs has tons of great items and you are only limited by your imagination.
Thanks for stopping by!
 
Small Fernli Corners (available upon request)