Wednesday, 20 January 2016

Stencil Storage with The Crafters' Palette

Good morning crafters! I am here to share a fun and easy storage idea for you today, featuring items from The Crafters' Palette.
 
This month we are all about storage at The Crafters Palette, and I am a self admitted stencil hoarder!  I am always looking for ways to keep my stencils organized and this was a idea I had a few years ago, and as my stencil stash grew so did my need for storing them. 
 
 
Start off with some chipboard a little larger than the size of your stencils to allow for the pages to open and the rings for attaching the front and back cover.  I gessoed the chipboard and then punched holes in the side of the pages to add the metal rings.
 
I used some of my favorite paints from Dylusions, Vibrant Turqouise and Crushed Grape. I brushed them on in a random pattern and then I added some tissue paper over top. Once the paint was dry I got out my Bo Bunny Stamps and again randomly stamped on the background to add more texture. I used multi matte medium to decopage the tissue paper on the covers.
 
 
 Here is how the covers looked at this point. I got out my Distress Ink Sprays and used the Brushed Pewter and Evergreen Bough to add splotches to the background. Now it is time to embellish.
 
 
 I used various wooden pieces and metals from my stash, however you can find lots of great pieces to embellish your book at The Crafters' Palette Store .  I used the Distress Inks again to colour the wood and metal to give them an aged and distressed look.


I plan on making more of these books to house my stencils and the great thing about these is you can make them anyway you want, simple or fully decorated like this one, I hope you will give it a try!
 
 
Thanks so much for stopping by today, and don't forget to check out The Crafters' Palette Blog to keep up with all the new things the team is up to!
 
 
Other Products


Thursday, 7 January 2016

Laura's Loft DT January Blog Hop!


http://www.lauralscott.com/
 
Good morning friends, and welcome to this months blog hop with Laura's Loft! I am very excited today to share my project, as this is my very first hop with the Laura's loft team!
I am sure you have come from one of the other talented DT members pages and don't forget to stop over and check out all the blog posts so you can win!
 
TO ENTER:
There are several ways to enter and the more comments you make in the different social media outlets, the more entries you earn! It is required that you comment on each blog in the Hop.  After that, you are encouraged to like, and comment on our Facebook page, tag on our Instagram post and pin on Pinterest, as well as share on your own pages.The participant with the most entries wins the fabulous prize package! How cool is that!?!

The Prize:
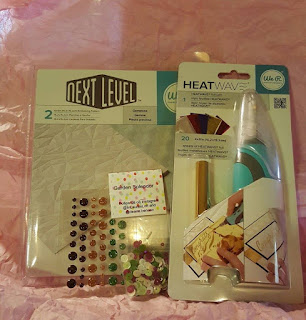
"Love Grows Here" Prize
WRMK Heatwave Pen Starter Set, WRMK Next Level EF "Gemstone", LL/DCB Sequins "Garden Splendor" & VT Enamel Dots "Autumn"

This month we are also excited that we have 2 new guest designers with us!
 
If you have stopped here, then do be sure to go back and check the previous Hop Stop by clicking the link below to go there.
 
 http://thecre8tivestudio.blogspot.ca/2016/01/blog-hop-at-lauras-loft.htm6
http://heartofcraft.blogspot.ca/2016/01/lauras-loft-hop-and-shop-love-grows-here.html
 
Now on to my two projects for today!
First up is my banner.

 I have created a very fun "Love" Banner using some stamps and dies from Laura's Loft.
I first die cut out the largest die from the Tag Buddies Set and layered it on top of some pink pattered paper from Graphic 45.

Next, I used the 2nd largest die in the set and the Curtis Background stamp on some vellum and attached that to the tag.

Now for the embellishments! I used some wood letters to spell out "love" and used some WOW embossing powder in platinum to add some sparkle. I also used some glittery enamel dots to the side of each letter.

I attached the tags with some pink lace from my stash, and added a glittery rose flower to the top and a bakers twine bow to the bottom to finish it off.
 
I hope you like my project for today and don't forget to hop over to the next blog for your chance to win!
 
 
My next project is a card for a friend.

For this card I have used Altenew Whimsical Flowers Stamp and Dies, and also the Halftone Hello Stamp and Die from Altenew as well.
 
I matted my card at the top and bottom with some patterned and plain black paper. I then used some watercolours in muted green tones for the background.
 |I stamped out the images and then die cut them using my Big Kick.
 Now it is time to assemble. I used some multi medium matte to glue down the halftone hello word, and also for the flowers as well.
Some of the flowers and leaves I used dimensional tape to pop them up and give interest. I used more watercolour in black for the flower stems. Lastly, I used a wooden butterfly from my stash and come little pearls for accents.
I hope you like my projects today and will pop over to Laura's Store to see all the great goodies she has!!


 To move on to the next blog please click this link to hop on!
 
http://dabblesbylinda.blogspot.ca/2016/01/love-grows-here-with-lauras-loft.html

In case you have missed any of the blogs here is a complete list for you.

1. Laura  -  http://www.lauralscott.com/love-grows-here/
2. Deana Benson -http://www.designcreativelybling.com/2016/01/lauras-loft-love-grows-here-shop-and-hop.html
3. Jasmine Burgess -http://journeywithjasmine.blogspot.com/2016/01/love-grows-here-blog-hop-with-lauras.html
4. Robbie Rubala - http://inkedx2.blogspot.com/search/label/LL
5. Heart of Craft - http://heartofcraft.blogspot.com/2016/01/lauras-loft-hop-and-shop-love-grows-here.html (Emma)

7. Kim-(YOU ARE HERE) http://angeldreamcrafts.blogspot.com/2016/01/lauras-loft-dt-january-blog-hop.html
8. Linda Gorman-  http://dabblesbylinda.blogspot.com/2016/01/love-grows-here-with-lauras-loft.html
9. Lisa Bedigian - http://royalpumpkinart.blogspot.com/2016/01/love-grows-here-shop-hop-with-lauras.html
10. Valentina Dalmonte - http://valentinascrap.blogspot.com/2016/01/love-grows-here-dtlaurasloft.html
  Nico Scrap- http://niccoloconduec.blogspot.com/2016/01/lauras-loft-blog-hop.html


Wednesday, 6 January 2016

Laura's Loft DT Casual Friday New Releases!!

http://lauras-loft-shop.myshopify.com/


 Hello friends, Kim here today and I am excited to share my Card featuring Casual CAS-ual Fridays Stamps​ and Dies. We are celebrating Valentines Day and CAS-ual Fridays new releases today over at Laura's Loft ! For this card I used the Curtis back ground Stamp and the Tag Buddies Dies.

Using some Hero Arts Shadow in the mid tone colour range. I used a pretty bubble gum pink on some pink card stock to give a tone on tone effect to the background.

 
Once I had let the ink dry I used some dimensional foam tape to pop the card up and give it some height. Now its time for some die cutting!

For the first layer I used the largest die from the set and some white vellum paper so that you could see the background through the vellum. 

 
I then used some of My Favorite Things paper and the next size of the die, keeping it all with in the pink tones for Valentines Day. I used some multi matte medium to tack it down on the cardstock.


Once the card was assembled, it was time to get out some of my favorite embossing powder. I used the Ho Ho Ho, Wow! Embossing Powder for the wooden heart in the centre.  It really added a lot of sparkle. Laura has a huge selection of Wow Embossing Powders in her shop you can check them all out HERE


 I also used the Hopes Desire Sequin Pack, and added some of the sequins and doves from the pack to add interest to the card.

I added a final touch of a metal number plate from Tim Holtz and some bakers twine and that finished up the card!

Thanks so much for taking a look at my project today. Don't forget to check out all the great items in the Laura's Loft Store and Blog
You can find out more info about the CAS-ual Friday new releases on Laura's Blog
HERE
Other Items Used
Versamark Clear Ink
Hero Arts Bubble Gum Ink
Tim Holtz Metal
Red Bakers Twine
My Favorite Things Paper
Vellum

Monday, 4 January 2016

Guilded Lily Wooden Match Box - Featuring Fernli Designs Products


Hello friends, and happy Tuesday!  Its hard to believe another year has come and gone, and as January is now upon us, I get in the organizational mood, and look at things in my crafty stash to see how I can make them into little gems that can have a dual purpose of looking great in my space, and also storing some crafty goodies inside.
 
 
Today I have this cute little wooden matchbox from Fernli Designs. I love these little boxes, and believe it or not, they store more than you think they might!  This one is going to wing its way to a dear friend in the USA, and it will hold a few little surprises inside for her to use.


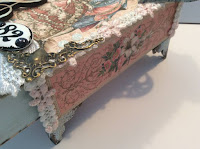
The box is made from MDF wood, and was super easy to put together, here is a shot of how the box looks in its original form. I put it together with some Beacon's 3-in-1 glue. I then painted the box with some Martha Stewart paint in a sky blue colour and then it was time to add the paper.
 
 
I covered the box with some of the gorgeous Graphic 45 paper called The Gilded Lily. I used Mod Podge to put on the paper on the box and once that was dry it was time to embellish.
 
 I also used a little heart and treble clef from Fernli Designs, which I got in a Grab Box from them. Fernli has these boxes a lot on their site, and to me they are value for money as you get so much in your box for a mere 10 Pounds UK!


I painted and papered the inside of the drawer as well, and sanded the edges of the drawer so it would open and close smoothly. I also wanted it to have a slightly distressed look to it, and this achieved it.
 
 
I added lace to the sides of the box and some flowers and for the metal embellishments I heat embossed them to also give them a worn and distressed look.
 
Thanks so much for stopping by my blog today, and you can check out all the great items at Fernli Designs by clicking the links below!
 
 
Other Items Used
Graphic 45 Gilded Lily Paper and Metal Number Plate
Martha Stewart Paint
Butterbeescraps Metal Corners (for the feet and top of box), Drawer Pull
Wow! Embossing Powder
Lace From My Stash
Mod Podge Hard Coat


Friday, 1 January 2016

Celebrate 2016 Card for The Crafters Palette Design Team

 
Hello and Happy New Year! Today I am sharing a simple and easy card that will help you to ring in the new year in style!
 
I have been doing a lot of mixed media lately, and this time felt in the mood for something clean and simple.
 
I started this card off with some simple black cardstock on a 5 1/2 x 4 1/4 white cardstock base.  I used up some cardstock from my stash, but Crafters' Palette has a great selection of Bazzill Cardstock you can find HERE
 
 
I used my ultra high adhesion double sided tape to attach the black cardstock to the base.  I got out my celebrate stamp and used some clear Versamark ink to stamp my sentiment on the card.
 

Next I wanted to have a night sky sort of feeling to the card, so I got out my Distress Ink Spray in Brushed Pewter . I gave the card a quick spray and then removed the spray lid and dabbed some of the ink on the card, the result is fun and so easy to do!
 
I painted my chipboard white and then used some Cosmic Shimmer Ultra Thick Embossing Powder in Clear to give it a lovely shimmer.


Now it is time to assemble my card. I centered the embossed chipboard on my card and attached it with some Glossy Accents.
 
 
Here is my completed card. I hope you have enjoyed this clean and simple tutorial today. These cards are easy to make and great for those times when you have to make multiples of something.
 
Don't forget to check out all the great items in the Crafters Palette Store and I hope you all have a fantastic 2016!