Saturday, 20 October 2018

Mixed Media Gift Boxes Featuring DecoArt


Good morning everyone, Kim here, and I am very excited to share my first project featuring DecoArt!


I was absolutely thrilled earlier this month to be accepted into the DecoArt Blogger Outreach program. DecoArt has some amazing products that I am so happy to be working with, and their support of artists is just amazing. So lets get on to my first project!


When I unboxed my package from DecoArt, all my items were packaged so neatly in some cardboard boxes. I immediately decided they needed to be altered!  With the holiday season nearly upon us, I decided to get a headstart and make these two boxes up. 


I started off the box with a coat of white gesso, then used some of the DecoArt Modelling Paste on the top and sides of the box.


The first box I painted with the DecoArt Dazzling Metallic Rose Gold. DecoArt has a huge selection of the Dazzling Metallics, which you can find HERE.


Once the box was painted, I added some clay molds I had previously made. I adhered them on to the box and then dry brushed more the the Dazzling Metallics Rose Gold, but then also used some of the Metallic Lustre as well. The metallic Lustre is great for getting in all the cracks and crevices of the clay molds, it really made them dazzle!


I added some micro beads, pearls and glitter glass for some extra sparkle to the box to finish it off.


My second box is similar, in that I used the paper clay molds but this time, decided to give it a more vintage feel.


I painted the box with the DecoArt Decor Chalky Finish in Linen.  I felt it needed a bit of a shine to it, so I then added a layer of DecoArt Metalllic Pearl Paint, which gave such a gorgeous shimmer to the box. Next, I placed some Tim Holtz tissue paper over the top to add some dimension.


I used the Americana Antique White paint, which I watered down and brushed over the tissue paper.


I then glued on the paper molds to the top of the box and the front.


Once the paper clay molds were in place, I added more of the watered down paint and dried it. The next layer was more of the Metallic Lustre in Rose Gold over the top of the molds to get into each of the grooves.


I kept layering on paint, then Metallic Lustre, and then a final coat of the Pearl Metallic paint over top.


I added some rhinestones for some sparkle as a finishing touch!


I am super happy with the effects of all the DecoArt products!  I am going to be filling these little boxes with some gifts for someone to find under the Christmas tree!
Check out all the DecoArt products at 

DecoArt Products Used
Americana Paint Antique White
Americana Paint Dazzling Metallics Rose Gold
DecoArt Metallic Pearl 
Metallic Lustre Rose Gold
DecoArt Chalky Finish Linen
DecoArt Modelling Paste


Friday, 19 October 2018

Cheery Christmas Door Hangers White Rose Crafts DT


Good morning everyone, Kim here with my next design team project for White Rose Crafts!
It's Gearing up for Christmas week at White Rose and they have a special offer this week of
15% OFF everything in the Christmas Shop section of the store. Now that's a bargain!!
Use The Code: CHRISTMAS IS COMING at the checkout!


So, lets get to my projects!  I am entering a challenge on YouTube, which a friend of mine does each year.  We are challenged to make Christmas themed door hangers for her Mom's residence she lives in.  Its a fun challenge and lots of YouTuber's and Bloggers join in, to make Christmas a little brighter for the folks who live there.

First up is my Merry door hanger. I started off with both of my hangers using some sturdy cardboard. I covered this first hanger with the gorgeous Craft O'Clock paper called Brrr...Its Cold Outside. I love the blue and grey tones of this paper.


Once the paper was down, I got out the Momenta Deer Head with Fauna Stencil and some Aleen's Glitter Snow and added the deer and leaves pattern. I wanted the Deer to stand out so I left it white, but used some mica powders from my stash over the leaves and it gave the texture paste a lovely glow.


I added some metal snowflakes and trim from my stash, but also used the gorgeous Recollections Dimensional flower pack and the super cute Dress It up Holiday Cookie Cutters from White Rose for decoration.


Lastly, I added some white paint around the edges of the piece to give it a frosty look then added some fiber around the edges as well. I got out some old scrabble tiles and spelled out Merry for the top, and added some of the Dress It Up Snowflake Buttons from the store.


The second door hanger I made in gold, red and cream colours.  It was the same process to put it together,but this time I used the Craft Creations paper called Christmas Words for the background. 


I added some gold and cream trim and fibers and also used the American Crafts Ivory Glitter ribbon and another of the snowflake buttons in the center.


I then added a Tim Holtz Christmas word band and more of the pretty Recollections Flowers from the Flower Garden Pack as well for lots of colour.


In the center I added a paper doily, and a wooden snowflake which I embossed using the Ranger Holographic Embossing powder from the store. Once that was finished I added a number 25 to the middle and some of the Doodles Paper Playground Sparkle Blend in Candy Cane. Another pretty Recollection Flower topped it off.


Here they are side by side!


I had so much fun using lots of White Rose Crafts goodies and making these Door hangers for a great cause. 

You can check out all the items I used in the White Rose Crafts Store or check out their Blog for more info.

White Rose Crafts Products Used

Other Items Used
Cardboard
Hot Glue
White Paint
White Wool Fiber
Laces and Trims
Jingle Bells
Paper Doilies
Wooden Snowflake
Various Tim Holtz Items


Sunday, 14 October 2018

Teeny Weenie Boxes For ScraPerfect


Good morning ScraPerfect Fans! I have created some teenie weenie boxes this time with a vintage vibe to them.  This is a super simple project and with the help of the ScraPerfect  products, you can make these tiny boxes for stocking stuffers, or pop a little suprise inside for someone special.


I started off with some 2 inch paper mache boxes and then gave them a coat of gesso. Once the gesso was dry, I used some Prima Art Alchemy paints in my favorite colours. Once I was done painting, I used The Best Cleaner Ever to clean my brushes. This stuff is amazing!! It cleans my brushes and leaves the bristles so soft!


When the paint was dry, I got out some Lindy's Stamp Gang mica powder in marigold gold red. I dusted the boxes with it, and it gave them a lovely shimmer.


r
 I then used the Best Glue Ever to place little doilies from KS4U on the top of the boxes and I also used some embroidery floss in coordinating colours to add texture to the top of the boxes. My Best Glue Ever has the No Clog Writing Cap on it, so I use minimal glue and it always flows nicely!


I then added some of the Tim Holtz paper dolls, and some of the pretty flowers from the Wheel of Embellies. All glued down with the Best Glue Ever.


I added a bit of lace from KS4U around the boxes and then took more of the embroidery floss and wrapped it around the lids and bases to finish them off. 


A few pearls and flowers added a final touch.


I hope you like my teenie weenie boxes I have created, they were so easy and fun to make!


Other Products
2 Inch Paper Mache Boxes
Laces and Doilies from Kraftsupplies4U
Embroidery Floss
Pearls From My Stash
Tim Holtz Paper Dolls
Prima Art Alchemy Paints
Lindy's Stamp Gang Mica Powder


Thursday, 11 October 2018

How To Create Faux Tiles With Embossing Folders & Distress Oxides White Rose Crafts LLC DT


Good morning White Rose Crafts fans! Kim here today with my very first Design Team project, and I am so excited to share it.  I have altered a simple wooden frame, and used some fun techniques with lots of WRC goodies!


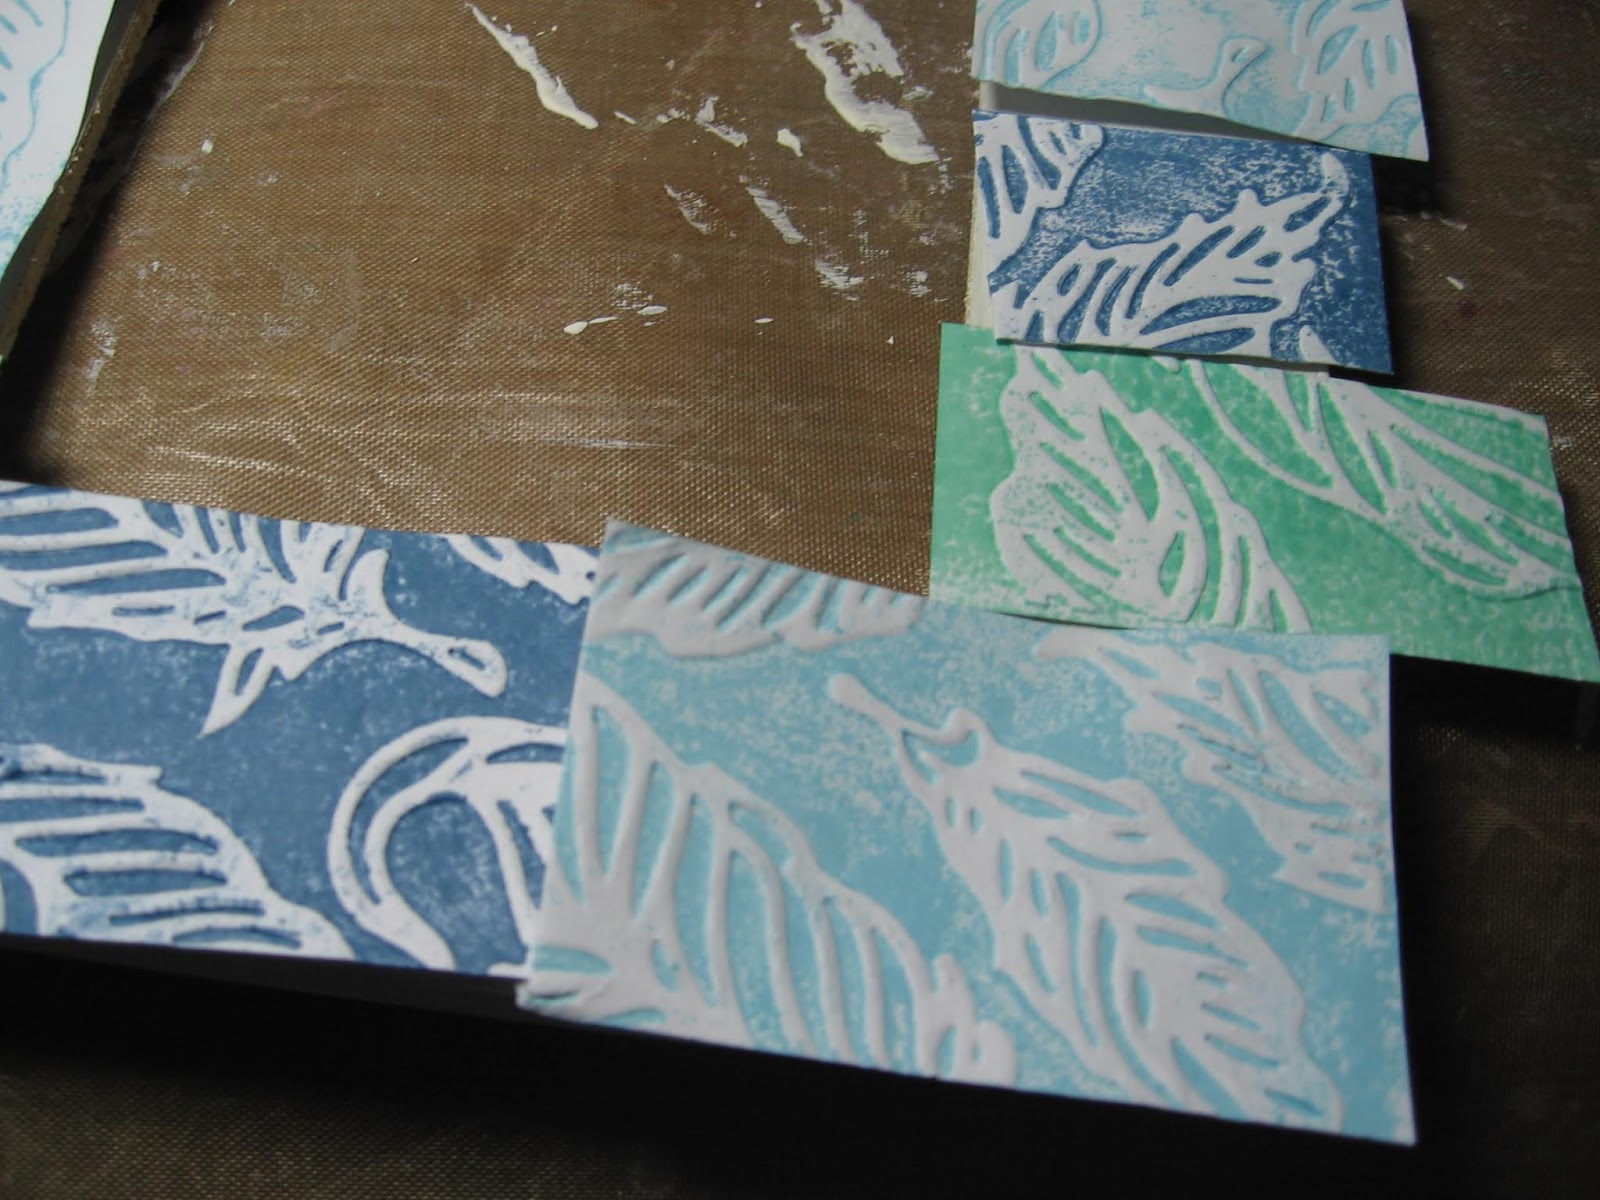
The first step is to choose your Distress Inks and Oxides which you wish to make your tiles into. You rub your inks directly on the flat side of your embossing folder. I am using an Elizabeth Craft feather embossing folder which you can find in the WRC shop.


Ink up your folder generously, I used Faded Jeans for this, and you may have to re ink it and run it through a second time, but be generous with the ink. I prefer the worn look, but for a more solid look on your paper you can run it through as many times as you wish. I used Cracked Pistachio and Tumbled Glass in the Distress Oxides


The result when it is embossed is that you have the dark space which you inked and when embossed, the white from the card stock will be raised up. Its a really cool effect and has so many applications!


The next step is to prep the frame, which I used some Americana Decor paint, but you can use what ever colour you like. 


Once the paint was dry, I took my paper and cut it up into squares and rectangles to make my faux tiles. I laid them out in a pattern I liked and alternated the size and colour of the tiles.


I glued the tiles down with a strong glue and cut off the excess and then sanded the frame to ensure the tiles looked even and smooth around the edges.


I wanted to make some embellishments that matched the feathers from the embossing folders, and decided to make some paper ones rather than use real ones. I did this by adding some thin wire in between two pieces of paper and then cut them into feather shapes, fringing around the edges. I then used my Distress Oxide in Tumbled Glass to give the feathers a bit of colour.


I added some of the Amercian Crafts Ivory Glitter Ribbon to the top of the feathers, and then
I added some glitter from my stash, and a Doodles Paper Playground Sparkle Blend called Vixen, to the feathers for some fun sparkle.


Next I added some pearls from my stash  and the gorgeous Recollections Flowers from WRC in coordinating colours.


I wanted to keep the centre of the frame simple, so I used a piece of paper from the Winter Moments by Craft O'Clock Paper Collection, and also the Breathe Stamp from the Kelly Creates Quotes 1 Stamp Set.


I felt the tiles needed some "grout", so I used some of my texture paste and a small brush and added it around the frame on each of the tiles.


I think the effect is something fun and different, and it gives you a new way to use up those embossing folders and create a fun home decor item.


Thanks so much for stopping by today, I really hope you have found some inspiration here!

White Rose Crafts Products Used

Other Items Used
Wooden Frame
Texture Paste
Paint by Americana Decor - Colour Lace
Pearls