Thursday 27 November 2014

"Flying Diva" Mixed Media Canvas by Kim Imagine Crafts Cross Promotion

Hello friends! Today I am thrilled to share my mixed media canvas featuring the products of Imagine Crafts and of course Rubbermoon goodies as well!  I really love doing canvas work, and was truly inspired by the inks and sprays from Imagine Crafts, they work so well with the stamps, this was really a fun project.
 
 
I started off with a 10 x 10 canvas and started to layer on some vintage music paper, drywall tape and two of my favorite colors of Fireworks! sprays, in Bahama Blue, and Paris Dusk.  These sprays are really vibrant and work so wonderfully on the canvas, they come in a huge range of colors as well.
 
 
Next, I worked on some of the chipboard pieces from Gina's Designs that I wanted to add to my canvas. Imagine Crafts has such a great line of inks and embossing powders, I used a mixture of both to add life to the blank chipboard. First, I used the Memento Luxe Bahama Blue all over the Butterfly of Gears chipboard piece from Gina's, then when the ink was wet, I added some silver and black embossing powder to it. This really gave the illusion of layers and textures on the butterfly.

 
Once the embossing powder had cooled, I edged all around it with more of the Blue Memento Luxe ink and added a few sequins and bling with a key in the center to finish it off.


I also used the black Imagine Crafts embossing powder on the diamond texture sheet from Gina's Designs. I love this embossing powder, it is very fine and gives fantastic coverage!
 
 
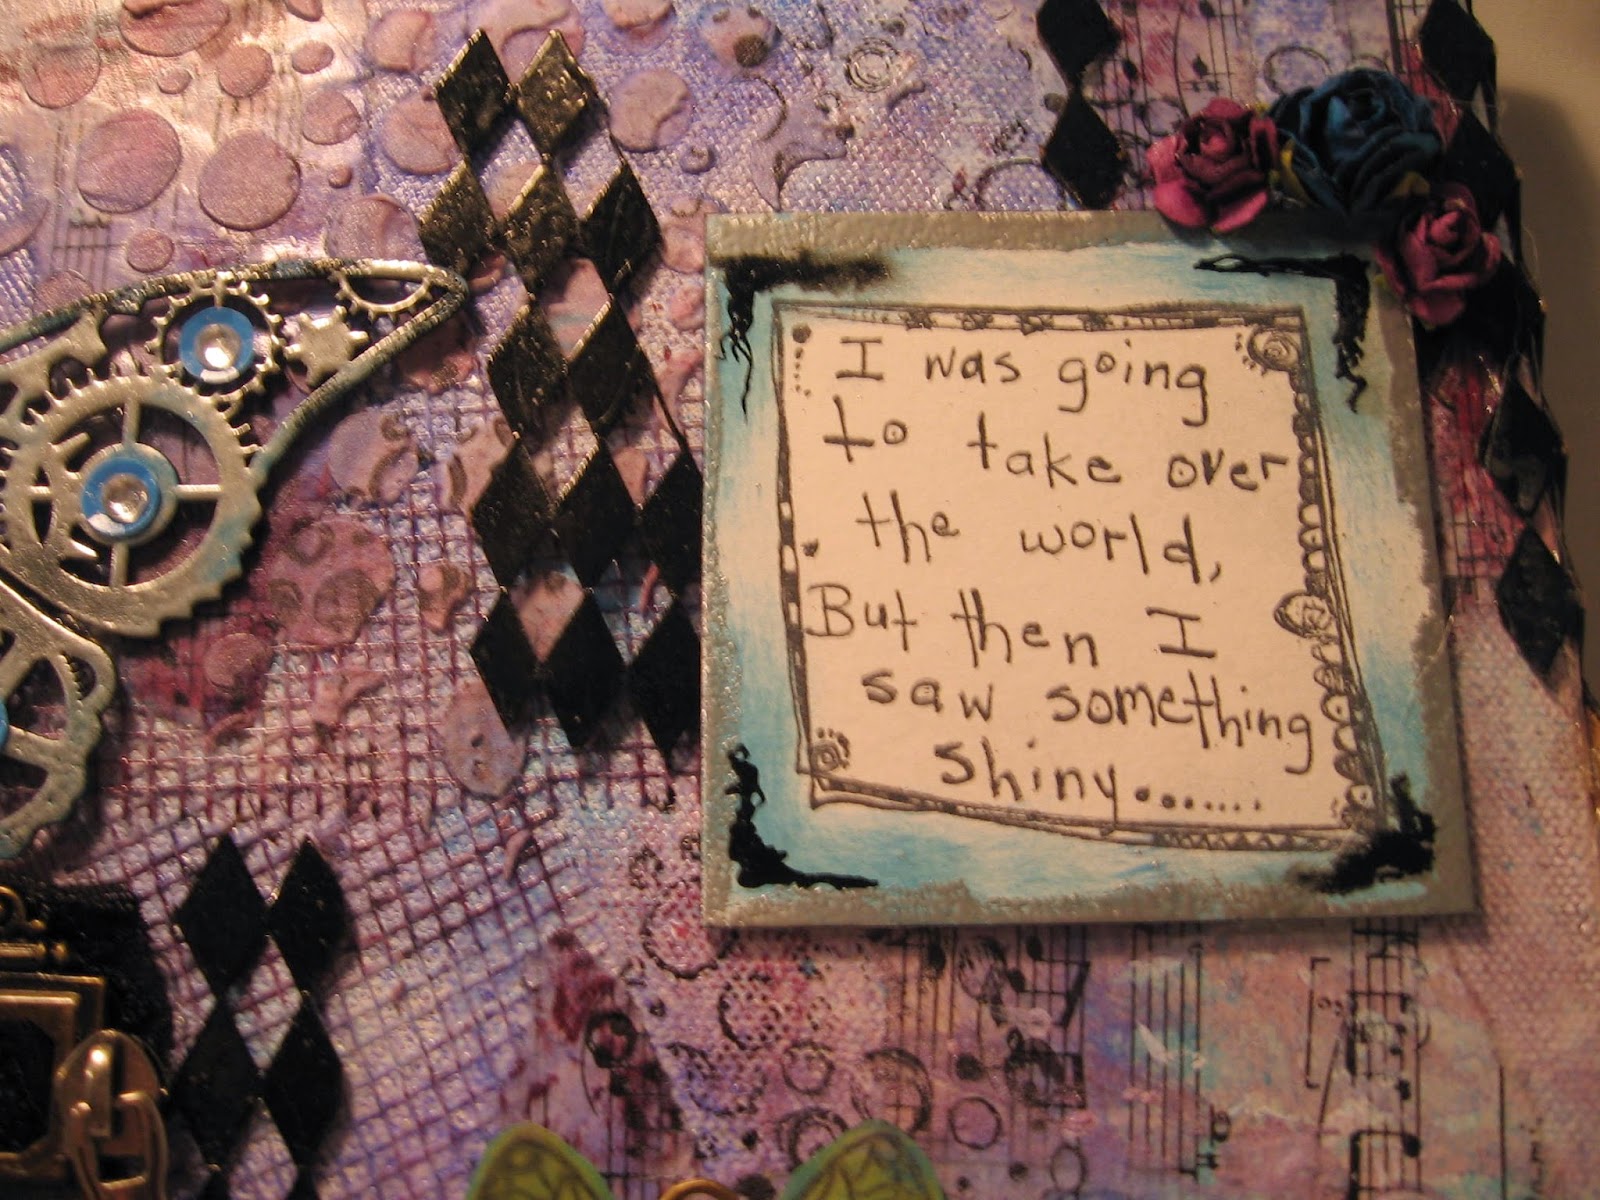
I also used the Something Shiny Stamp as well. I stamped it on top of one of the 3 x 3 Inchie Art Squares that are sold in the Rubbermoon shop.  I also layered on some more embossing powder using the Versa Mark Pen, so I could just edge the mat board and control where the embossing powder went.  I added some more of the blue Memento Luxe ink and some of the Black Pico Embellisher, from Imagine Crafts on the corners to finish it off.

 
Here you can see some of the texture in the background of the canvas with the music paper, embossing paste and a circle stencil. I also used the Dots and Circles Stamps (one of my favorites!) to the background as well, using the black Stayzon Ink from Imagine Crafts.


 I also used some of the Vertigo Sheets from Imagine Crafts, I really love this stuff!! I thought it might be fun to play around with it, so I used the new Wings stamp by Kae Pea, and stamped on top with more of the black Stayz On Ink.  I then cut out the wing shapes, and used the Bahama Blue and Pear Tart Memento Luxe inks on the back of the wings to give them color.


This is the result!  I added some tiny keys from my stash and a coordinating flower to the center of the butterfly and flanked them beside more of the Gina's Designs Chipboard number plates, I am super happy with the result.
 
 
I hope you have enjoyed seeing my project today, and will hop over to Imagine Crafts website to check out all the amazing items they have in their store, I know I am totally a customer for life!
Thanks so much!
 
 
Other Items Used
Vintage Music Paper and Drywall Tape From My Stash
Lace, Metal and Flowers From My Stash
 

Friday 21 November 2014

Snow Mitten Banner Gina's Designs DT Project

Hello friends, today I am here to share with you my take on the Micro Mitten Mini Album. I turned the mini into a vertical banner for my front door.  I started off my banner by using some of the pieces from the Winter Shape Set, the tree and the "Let it Snow" sentiment.  I embossed the words and layered them over the tree which I used some Snow Tex on to give the illusion of snow, and topped the tree off with one of the bling buttons from Craftsupplies1.


Here is the mittens which hang below the Let It Snow sentiment, it hangs on my front door.


 Below here are my mittens, I used some Lawn Fawn paper on them, then went around with some chalk inks to distress them a little. I topped the mittens off with some gorgeous laces, flowers and trim from Craftsupplies1, along with some fun Christmas mini lights I had in my stash.


I used some of the snowflakes from Gina's Snowflake set, which I textured and added some tinsel embossing powder to give them some shine. For the letters, I used some of the lady bug Prima chalk ink and then embossed on top of them  with a clear glitter embossing powder. I also used some embossing paste and a Tim Holtz stencil, Stars, to create a wintery background on the mittens.


I am really happy with how this turns out. Deann and I loved making this so much, that Gina is going to make a Snow Mitten Banner which will be in the store soon!

Thanks for stopping by today to check out my and Deann's projects.

Gina's Designs Items Used

Other Items Used
Lawn Fawn Paper
Flowers, Lace and Trim by Craftsupplies1
Prima Chalk Inks
Wendy Vechi Embossing Paste
Tim Holtz Stencil
Ranger Embossing Powders


Friday 14 November 2014

Happy Friday friends! Today I am sharing my Cabin In The Woods Shadowbox by Gina's Designs. This is such a great shadowbox and comes with some fun extras, including the chipboard fireplace, cabin and trees.
 
I used the Honey Chai paper on this box, but first I give it some paint and a crackle finish to pick up on the blues and brown tones in the paper. It worked well with the theme of the box.  I also used some of the Queen Anne's Lace chipboard and layered in some resin butterflies, dragonflies and flowers from Craftsupplies1.

 
There is plenty of room to decorate or store your favorite items!


 Here you can see the top of the box and the cabins and trees that come with the shadowbox. I used layers of inks on them to give them their muted tones.
 
I hope you have enjoyed seeing my project today.


Gina's Designs Items Used
 
Other Items Used
Kaisercraft Honey Chai Paper
Prima Chalk Inks
Prima Resin Pieces
Tim Holtz Metals
Paper Artsy Paints
Martha Stewart Paints
Crackle Medium
Flowers, Metals and Laces from Craftsupplies1
Cameos from my Stash

Tuesday 11 November 2014

A Very "Meowy" Christmas! Rubbermoon Stamps DT Project

Hello friends, Kim here today, I would like to share some fun Christmas themed cards I have created using Rubbermoon Stamps and some fun products from Imagine Crafts.
First up is my very "meowy" Christmas card. I love the whimsy with this card and the "Impurrfect" kitty cat stamp I used as a focal point.
 
 
I love the whimsy with this card and the "Impurrfect" kitty cat stamp I used as a focal point. Behind the kitty I used a scroll frame from Gina's Designs, and painted it a soft ivory color, then stamped the "stardust" in the background behind the cat.  I used some Imagine Crafts gold embossing powder to give a lovely shimmery look to the frame.
 
 
Behind the card I spritzed some of the Imagine Crafts Shimmer Spritz in gold and sparkle tones. Then used the Dots and Circles Stamp with some silver Delicata Ink from Imagine Crafts to create a fun background on the card.
 
 
Finally I added some metal snowflakes to each of the corners of the frame to finish it off
.
Here are some of the fun products I used from Imagine Crafts, I just adore their items and they really made my cards sparkle!
 
 
For this next card I used the 3 Snowman Stamp in the center, and colored them in with some copics to give some Christmas tones to the card.
 
 
For the background I used some of the Gina's Designs cardstock doilies. I laid them on my card and then used some of the  Fire works sprays from Imagine Crafts in Bahama Blue and Paris Dusk. I love the tones it gave, I really wanted to give the image of a wintery background.


I love the effect the sprays and doilies give, they really look like snowflakes!


After the sprays had dried I then used the Box O'Flakes Stamp and some silver embossing powder on top to add to the background. I really wanted a nice shimmer to the card, I also layered more of the Shimmer Spritz Spray on top as well.
 

I used some of the Art Squares precision cut matboard to layer on top of the background and used some of the Irresistible Pico Embellisher to draw snowflakes and dots on it. I then used more of the Fireworks sprays to complete the background look on the matboard.
 
 
I used some lace from my stash and a few more metal snowflakes and pearls, then popped the snowmen up with some foam tape.
I hope you have enjoyed looking at my whimsical cards today, thanks for taking a peek and have yourself a very "meowy" Christmas!
 
Rubbermoon Products Used
 
Other Items Used
Lace and Metal Snowflakes From My Stash


Sunday 2 November 2014

"Free Yourself" a Mixed Media Canvas Featuring Gina's Designs & Shimmerz Paints

Happy Sunday friends! Today I am sharing a mixed media canvas I created with lots of great items from Gina's Store.  I was inspired by my Shimmerz Products, and the colors of them. I used some of the soft muted Inklingz and Sprays to create the pastel background. I layered on some lace from my stash to give lots of texture and dimension.  
I then used my "art is" stencil, and used some of the Shimmerz texturez paste, and that completed my background.   I used some chalk paint on the dress form and then stamped on top of it with some lace to create a skirt on the form. The zipper pull I added finished it off.

The gears from the Gears Border and Corner set, were perfect to use! I cut apart the gears and used my Inklingz in gold and silver tones on them, and then layered it on top of some of the honeycomb from the Bee Set from Gina's.
I painted the Renata flourish white and added some gorgeous flowers and a metal key on top.
I am super happy how this came out, and love the soft and shabby vintage feel of the canvas.

I hope you have enjoyed my project today! Thanks for stopping by to take a peek!
 
 
Other Items Used
Petaloo Flowers
Wild Orchid Craft Flowers
Art Is Stencil
Lace from my Stash
7 x 7 Canvas
Prima Zipper Pull
Butterbeescraps Metal Clock Piece