Friday 29 August 2014

Oh The Places We've Been.....A Gina's Designs DT Project

Hello fellow travelers! Today I would like to share with you my Composition Box I have created.  I chose a travel theme for it, to represent all the places my family has been across the globe.  We all love to travel, and I thought it would be fun to represent that with the box.
I really love that you get extra items with this Composition Box, such as the wooden key, which is below right, and also the great little boxes which you can place momentos or photos in.


Gina's Designs also offers a personalized number to represent what you would like to do with your Composition box. I chose the number 10, as that is the number of my husband and I, our 4 children their spouses and our grandson. I wanted this box to show all the places we have been so far on our travels through life, such as England, Scotland, Paris, Germany, Mexico, Jamaica, Cuba, Vancouver and several other places in the USA and Canada. We are a family who loves to travel and this box is a perfect way to show it off.
I hope you like my project today, and hope you will get out there and see the world!
Thanks for stopping by!

Gina's Designs Items Used


Other Items Used
Bo Bunny Paper
Prima Metal and Wood Embellishments
Other Wood Embellishments and Union Jack Ribbon From My Stash
Tim Holtz Ticket and Crackle Distress Paint
Wild Orchid Craft Flowers
Metal Feet from Butterbeescraps

Monday 25 August 2014

Creative Blog Hop!!

Happy Monday my friends! I am super excited to share with you my part of a Creative Blog Hop I have joined in with thanks to Carmen Whitehead who is my fellow Teamie from RubberMoon Stamps. Carmen's Blog can be found here at Serendipity Studio

I have posted some of my work along with the answers to my questions, so I hope you enjoy taking a peek into my artsy world!
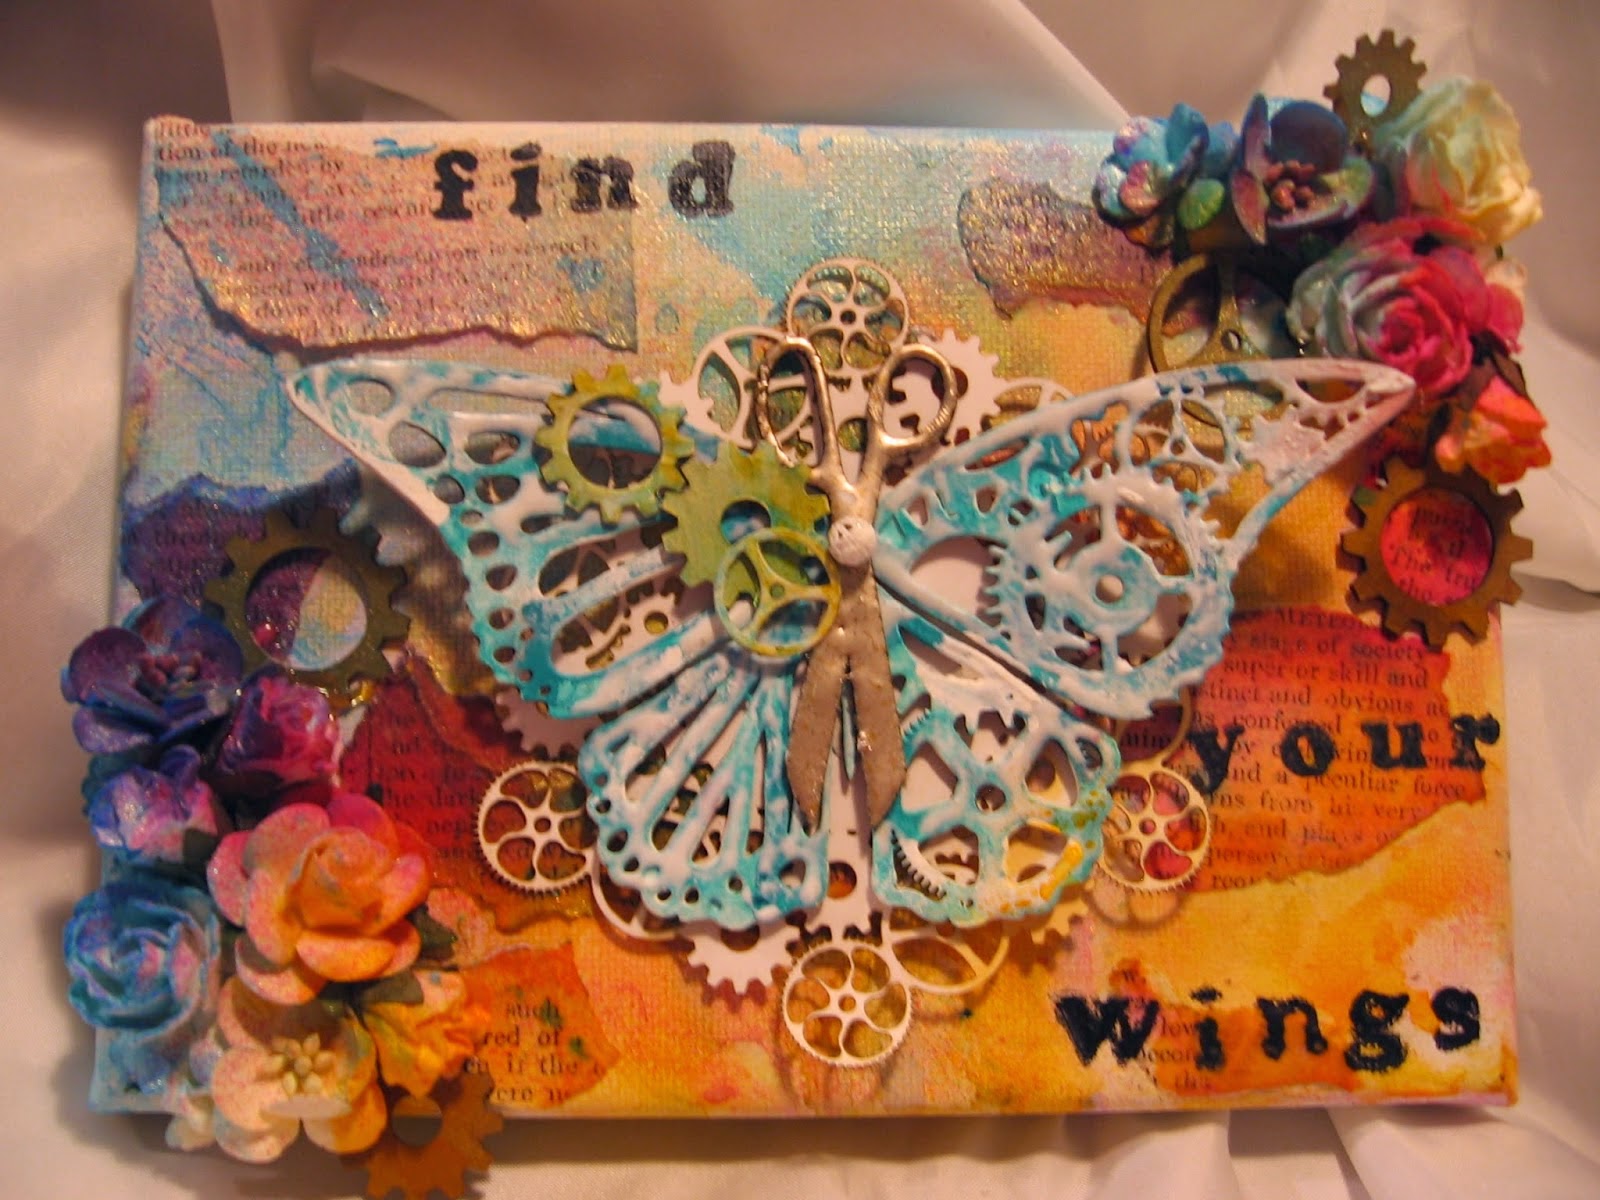

Mixed Media Canvas


So what is a Creative Blog Hop you ask??  It is a tour of creative blogs to meet new crafty friends, share inspiration and techniques. I think it is a truly amazing way to meet and greet new artsy friends and learn about their journey through their creativity. We are to answer some fun questions and then nominate a fellow Crafty Artist..so here we go!

1. What I am working on?
 Currently, I am deep in some mixed media work, and I couldn't be happier!  I really love this style of art, and am always wanting to learn more, it is always a process to learn and grow.   I am currently on 3 design teams, Craftsupplies1, Gina's Designs, and RubberMoon (where I met Carmen!) and the great thing about these teams is everyone is so creative and inspiring! I have even had the opportunity to work behind the scenes with Gina from Gina's Designs to create new chipboard pieces for her company. This is something I just love doing, it really gets the creative juices flowing!

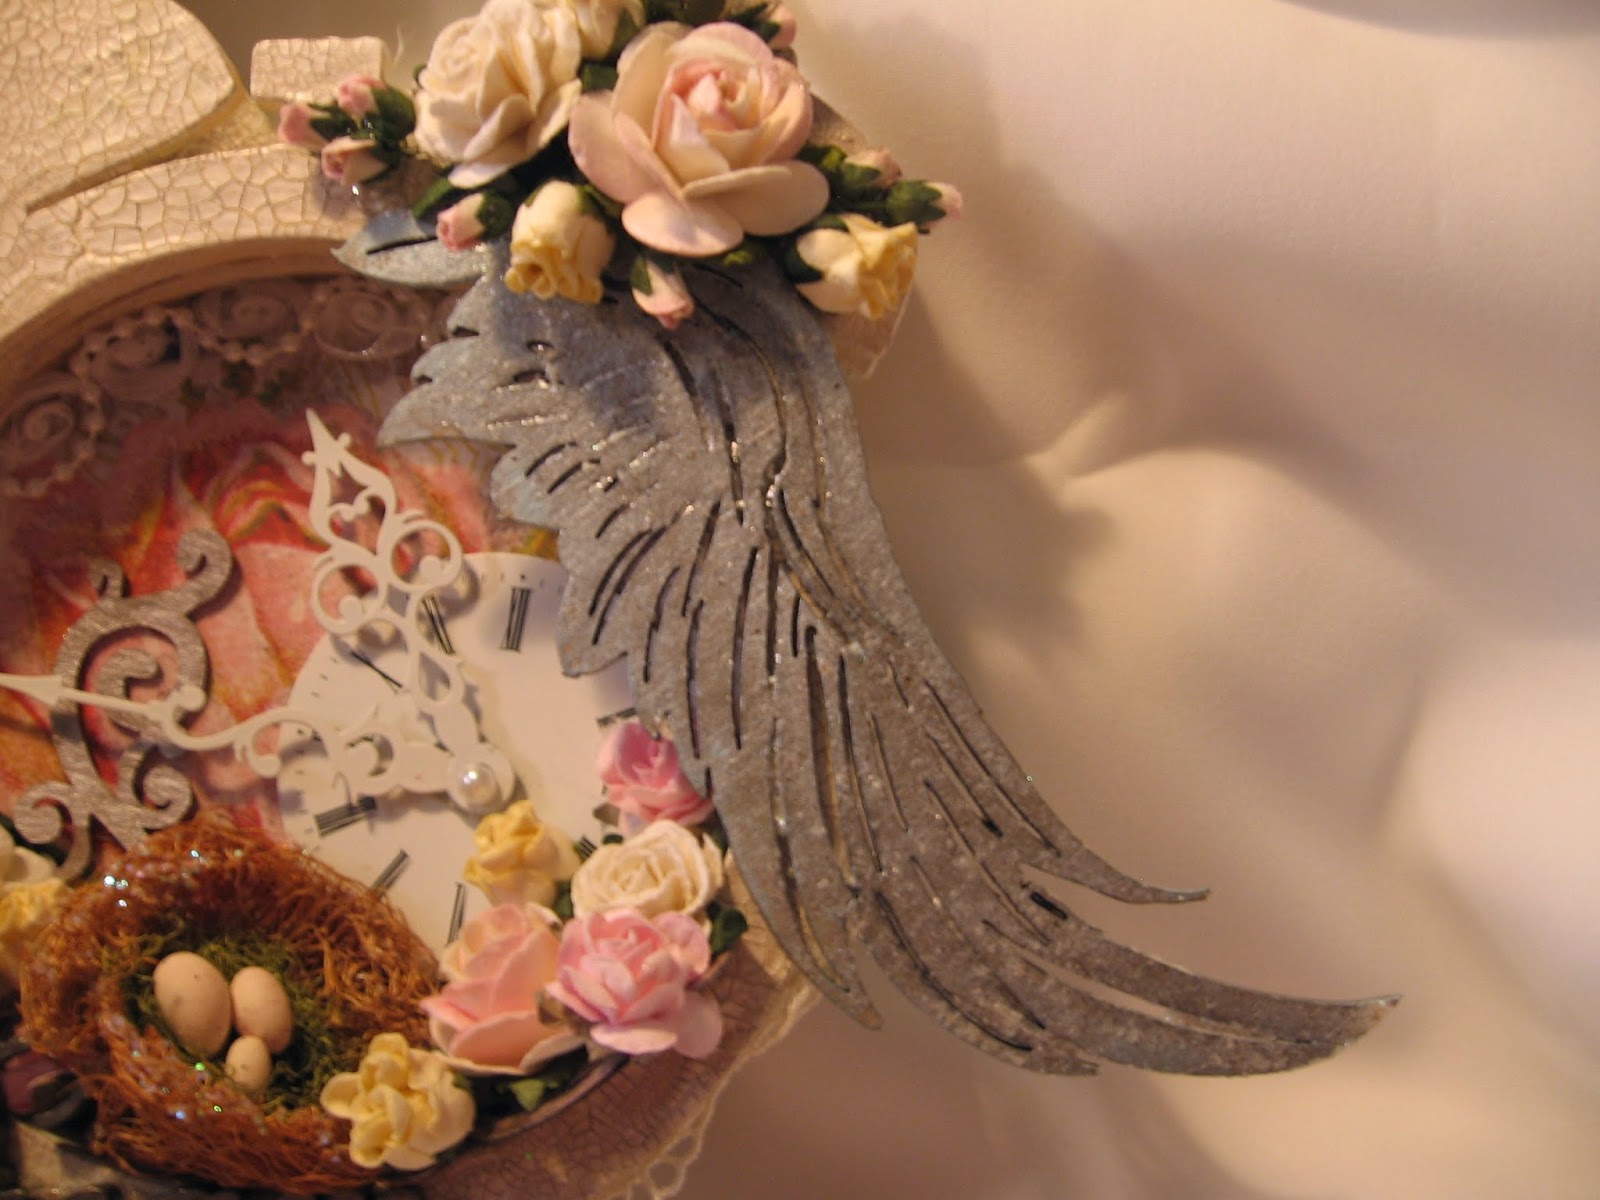
Multi Media Shadowbox
 

2. How does my work differ from others in my genre?
I have a rather eclectic style to be honest, I don't think I am locked into one genre. I love making shabby chic, grunge, mixed media, cards, atcs, mini albums and more. I think to lock oneself into just creating one style and one type of art really limits our creativity. Its good to experiment!
 
Encaustic and Mixed Media ATC's


3. Why do I write/create what I do?
It is really more of a need than a want. I have been artsy and crafty since childhood, and its just something that has always been with me. I went into a creative industry and owned my own flower shop for many years, and love the industry. I did large trade tradeshows and travelled all over the Province of Ontario doing weddings for many years. I loved it, but I needed a break and decided to set up a home studio an focus on my art, and I am having a total blast doing it!
 
Mixed Media Exploding Canvas

4 How does my writing/creative process work? (where do I get my inspiration)
I draw my inspiration from many places, nature, feelings, colour, moods and of course my very talented artsy friends who are constantly amazing me with their talents. Inspiration can come from so many places, its always a surprise when it hits!
 
Shabby Chic Tag & Art Style Mask


I would like to nominate my dear friend Mary TheCrafthoarder to hop along with me next week. Her post will be live on her blog next Monday, September 1.   Mary is a wonderful friend of mine and is also my teammate on Gina's Designs.

You can find Mary's blog here
MaryTheCrafthoarder
Please go over and show her some Blog love!
 

Thanks everyone for stopping by! Have a great week!


Friday 22 August 2014

Alarm Clock Shadowbox A Gina's Designs DT Project

Hi Crafty Friends! Today I would like to share my altered alarm clock shadowbox, one of the newer items in our store.   You get 6 layers to the clock which you can stack up to create depth, it's a super fun design!

I used some Distress Crackle paint on the clock and after it was dry I used some of the new Shimmerz Inklingz watercolors. I used the Inklings to dry brush over the cracks and it picked them up perfectly and really accented them.

Once I was done with that, I used some laces around the outside layers and the inside edges. I then used more Inklingz and Blingz on the chipboard wing and also on the wooden "dream" charm.
I added some embellishments, flowers and a cute little nest to finish off the clock.

 I really loved making this project.  It was quick and lots of fun to do. Check them out in Gina's Store!
Thanks for stopping by today!

Gina's Designs Items Used
Other Items Used
Wild Orchid Craft Flowers
Prima Clock, Nest & Hands
Tim Holtz Number Plate
Tim Holtz Wallflower Paper
Ranger Distress Crackle Paint

Monday 18 August 2014

Vintage Wedding Layout A Craftsupplies1 DT Project

 
Hello Crafty Friends!  Today I would like to share with you my Vintage Wedding Layout.  I have done it with a photo of my parents on their wedding day August 16th, 1958. 
Here are some shots of the gorgeous flowers from Craftsupplies1 I have used. There are a lot of great new items in the store!
 
 I love this sentiment, it really means a lot to me regarding my parents. I have used this from the Prima Something Blue ATC Pad.
 More beautiful laces and trims and flowers from Craftsupplies1

 
There is more photos and info below in my video, and do check out the links to the Craftsupplies1 Shop on Etsy and Zibbet.
Thanks for stopping by today!
 
Don't forget there is a huge SALE going on right now at Craftsupplies1
BUY ONE, GET ONE FREE ON PARCHMENT FLOWERS
 Sale ends on August 31st at midnight or when the flowers are gone.
You will receive a second flower identical second set to the one you purchase.
 No coupon needed
 www.etsy.com/shop/craftsupplies1
www.zibbet.com/
 
Craftsupplies1 Items used
White pearl trim
Light Blue Organza Floral Trim
Blue Satin Flowers
Pink Cotton Candy Flowers
Pink Roses
White, Ivory and Blue Fabric Flowers
 
Other Supplies
Chipboard by Gina's Designs
Tim Holtz Numbers
Wooden Frame From Michaels
Prima Something Blue Paper
Shimmerz Texturez, Paints and Dimensionz


Saturday 16 August 2014

Hello crafty friends! Today I would like to share with you my house wall hanging! This set of 3 is from the Birdhouse Wall Hanging Set, and I have modified them to be some fun little mixed media houses.


You can see in these photos that I have had some real fun with the background on these. I love doing mixed media and I started with a coat of gesso, then layered on some sprays to give a colorful effect.

After I used the sprays, I got out my stamps from Rubbermoon and my clay. I made impressions in the clay with the stamps, then used mica powders to color the clay. Once the clay was baked I was able to add them to the little houses. I also used some of the same stamps from Rubbermoon in the background of the houses. I stamped them on with some Stazon Black Ink. As a final touch I used some watered down white paint to create some splotches on the houses to give it a nice shabby look.


I used some words from the Words and Phrases 1 set on each of the tops of the houses and added some flowers in matching colors to finish them off.


I added some metallic ribbon from my stash to attach the houses together in a row to hang up. I love how they turned out!

I hope you like my project I have shared with you today!  Check out all the great goodies in Gina's Store!

Gina's Designs Items Used
Other Items Used
Wild Orchid Craft Flowers
Craftsupplies1 Flowers
Lindy's Stamp Gang Sprays & Mica Powders
Shimmerz Sprays
Silks Acrylic Glazes
Stazon Ink Black
Sculpey Clay
Ribbon From My Stash


Friday 8 August 2014

Cross Promotion with Kittys Scrap Post and Gina's Designs!

Hi Crafty Friends! I have some fun projects to share with you today. First up is a mixed media canvas I have created featuring our Cross Promotion Partner Kitty's Scrap Post Digital Paper.  I have used the "French Seamstress" paper for this canvas.

I started off by ripping one of the sheets of paper and distressing it for the background. I then layered on some Shimmerz paints and sprays, and some of the Shimmerz Texturez which I added to some of my stencils. I then added some gorgeous laces to complete the background.


Here you can see a close up of the dress form from the Vintage Seamstress Shape Set. I added more of the KSP paper to decorate the dress form, and I also cut out the butterflies from the paper and decorated them. I also used other pieces from the shape set, the Sew sentiment, and some of the buttons as well.
The flourishes are from the feathery flourish shape set and the tulip borders and corners which I added dimensional paint to, then some gold glaze paint, and some patina gilders paste to complete the look.


Finally in these photos above, you can see some of the texture in the background, and some of the pretty flowers and accessories I have added. I hope you like my project for Gina's Designs.

Gina's Designs Items Used on the Canvas
Other Items Used
Lace from MsGardenGrove
Wild Orchid Craft Flowers
Prima Stencils
Crafters Workshop ART IS Stencil
Next up here is my project I did for Kitty's Scrap Post, as I am on both teams I did double duty and created this banner from Gina's and once again added the French Seamstress paper to it. I love the outcome, I am super happy with it!


Kitty's Scrap Post Project Banner
Wild Orchid Crafts Flowers
MsGardenGrove Laces
Pink Seam Binding from my Stash

Gina's Designs Items Used on the Banner


My First RubberMoon Creative Design Team Project! An "Artful" Mask

Hello Friends! I am so excited to bring you my very first Creative Design Team project for RubberMoon!  I am just so thrilled to be part of this truly amazing team, and I wanted to share something that really represented my style for my first project.  I have created a mixed media style "artful" mask.  I had a lot of fun with this project, and it is something different to hang on my studio wall, other than a canvas.
 
I layered a lot of mixed media products on here, including some sprays, texture paste, and also the Gears stamp and some pigment ink, on the mask itself. I used an old paintbrush as the holder for my mask, and added some clay butterfly wings that I made on either side of it.
 I have used the Make Art Stamp, the Art Set and Large Dragonfly stamps as well  to adorn my mask.


I used the Julia Cameron quote stamp on the paintbrush. You can easily stamp on a round object by placing the stamp on your table and rolling the object to be stamped on top of it. This works great to give an all around stamping image on your object.
 
To create the stamping embellishments on my mask, I got out my watercolors and had a fun play around with them. I created a background on which to stamp my images on. 

After I used random brush strokes for the background I sprayed it with my mini mister, then used some paper towel to dab up the excess water. The result is you get a nice mottled background with a water droplet look.
 
After I completed this I got out some clear embossing ink and some fun and funky colors to emboss the stamp with, I used some of my brightest colours!

After I heat embossed it, I fussy cut out my images to use on my mask, these are the results. Then I added them to my mask along with a few other fun embellishments.


I hope you have enjoyed my project today and do go and check out the amazing stamps in RubberMoon's Shop! They are truly unique and "artful"!
Thanks for stopping by today!
 
RubberMoon Items Used
 
Other Items Used
Shimmerz Texturez, Watercolor Inklingz & Sprays
Ranger and Lindys Embossing Powders
Chipboard Mask from Gina's Designs
Clay Wings and Roses From My Stash
Crafters Workshop "Art Is" Stencil
Tim Holtz Burlap and Dots Stencils
White Roses from Crafsupplies1
Camass Pigment Ink Blue
Stickles Diamond

Monday 4 August 2014

Craftsupplies1 YouTube Hop!!


Craftsupplies1 YouTube Hop!! Lots of Chances to Win!! Make sure you are subscribed to each of the DT members channels, and Comment to WIN!

Friday 1 August 2014

Exciting News with RubberMoon!

Hello Crafty Friends! I have some exciting news to share!
I have been asked to join the RubberMoon Creative Team, and I couldn't be happier about it!  In case you don't know RubberMoon makes the most amazing Art Stamps and has such a wonderful creative team, I feel so honored to be part of it. Here is one of my projects that I submitted for the audition process. It is a journaling tag using some clear embossing powder resist technique. I used the Large Dragonfly Stamp and the Paint Fly Stamp for this tag. If anyone is interested in a tutorial, just drop me a line!
Embossing Resist Technique Featuring RubberMoon Stamps 
 
You will be seeing one project a month from me, but likely much more shares about their fantastic stamps!  They are truly unique designs, and one of a kind images.  I am thrilled to be a part of this team, the other ladies who are also on the team are so very inspiring, I just know I am going to grow and learn from them all!
 
I will post a link here and you can visit the RubberMoon Blog today and see this very talented team and do run over and join each of their blogs, as I am sure you will be very inspired by them all too.
 
My first project is coming up in a week or so, so stay tuned for that, I am already working on it, as I couldn't wait to get started! 
 
I hope you will pop back and see what I have come up with for my first project. Congrats to all the new ladies on the RubberMoon Team, this is sure to be an exciting adventure!