Friday 18 December 2015

Winter Heart Card And Tag Duo A DT Project for The Crafter's Palette

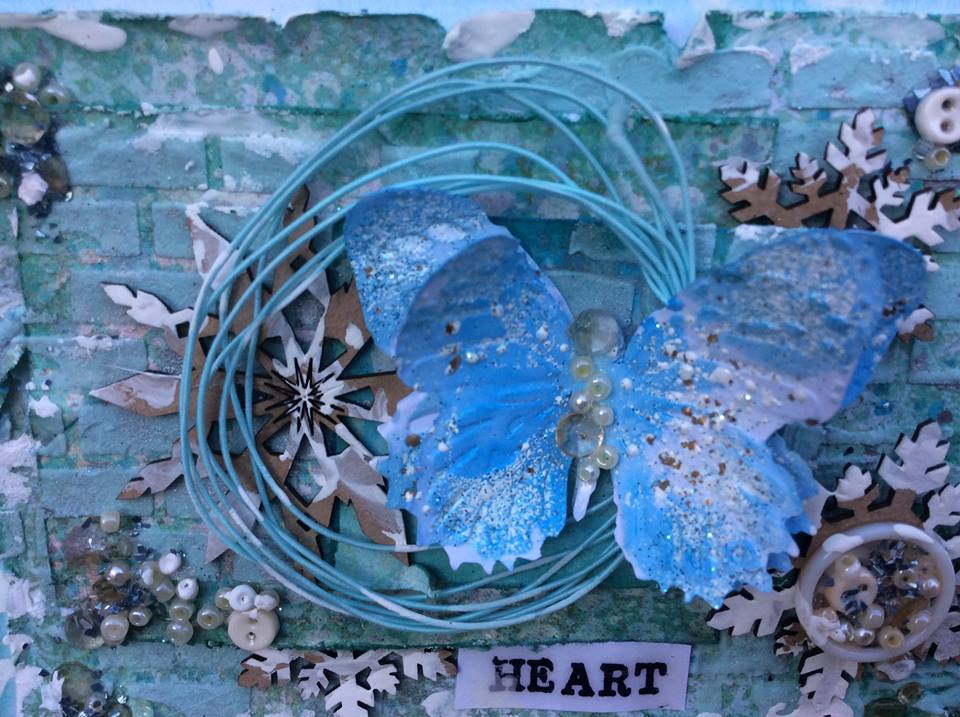
Good morning friends! Today I am sharing a fun and wintery project for The Crafters' Palette DT.  I created this card and tag set for a friend as part of her Christmas gift, in some shabby blue tones complete with die cut butterflies.


I was inspired by this beautiful Texture Fades die set by Sizzix, it comes with the die and also the embossing folder so you can create dimension on the butterflies as well. 


I die cut out the butterflies and then ran them thru the embossing folder.  Next I took my Distress Inks and created a watercolour effect with them by stamping them down on my craft mat and spritzing them with my Mist Its bottle


I used a small paint brush to dab the watercolour on the butterflies, making sure to get it in the raised areas. While the butterflies were wet, I sprinkled on some of the Frantage Shabby Blue Embossing Powder and heat set them.


I used more of the Distress Inks on the edges of the paper, tag I created and the edges of the card.


Next I used some embossing paste, (but you can use any type of texture paste for this, Crafters' Palette has a good range in their shop) and mixed it with some mica powder in a sky blue colour.


 Now that I had all my parts and pieces are ready, it was time to assemble and add my texture. I used some Christmas themed paper I had in my stash from last year, gave it the same watercolour treatment I gave the butterflies and then used my brick stencil to add the coloured texture paste.

 I assembled my card first using double sided tape on the paper layers, and using multi medium matte to glue down the butterflies, wire thread from Prima, and snowflakes. I layered each element on top of each other to give lots of texture to the card.  Next, I got out some buttons, tiny beads and my Glossy Accents and added them to my card for further interest and dimension. I layered a button on top of my chipboard snowflake and filled it with the glossy accents and put all my tiny beads inside.


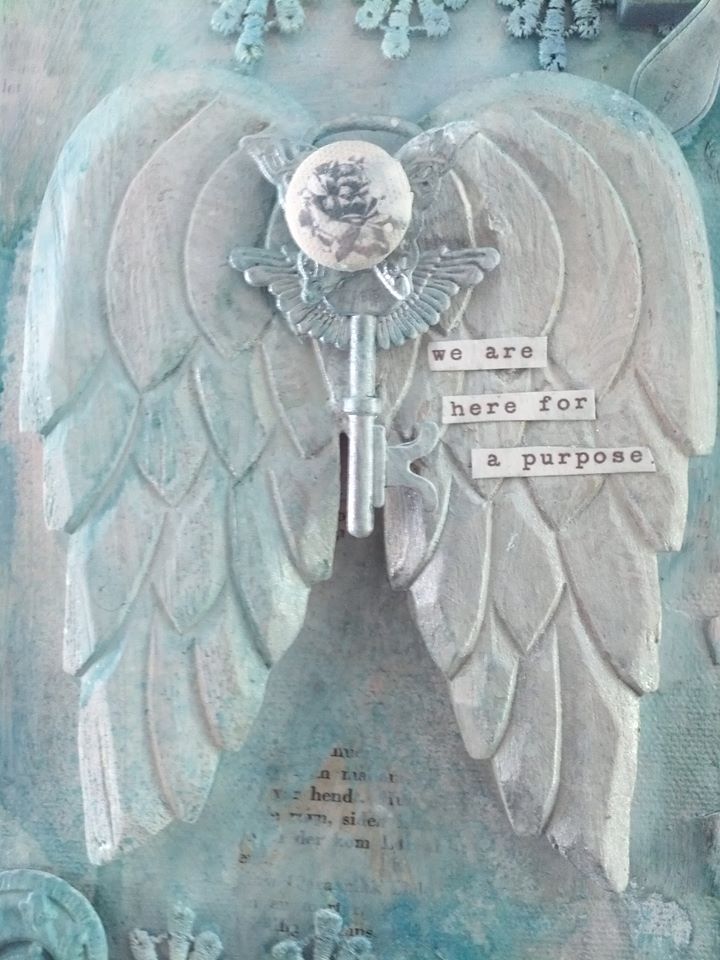
I assembled the tag in much the same manner, and added a final touch of gesso around the card and tag to give a wintery feel to them both.


Here is my completed card and tag duo! 
Thanks so much for stopping by today, and don't forget to check out The Crafters' Palette Blog to keep up with all the new things the team is up to!


Wednesday 9 December 2015

Mixed Media Christmas Layout with The Crafters' Palette


Good morning friends! It is that time of year again and today I am sharing with you my DT Project for The Crafters' Palette.  This time we were to do up a project and follow along with their map challenge.  Here is a photo of the sketch we were to follow.
I got out lots of fun products from The Crafters' Palette, my Distress Sprays, Paints and some Dyan Reveley Paints as well.

I laid out my pattern to have a loose interpretation of the map challenge, and keep within a Christmas theme. One of my favorite things about this time of year is the book A Christmas Carol by Charles Dickens. I was lucky enough to find some paper that fit this theme while out on my crafty travels so decided to go with that as my base.  I added some lace, chipboard and some old book paper from my stash as well to the piece.


 I added some of the distress paints to the edges of the paper in coordinating colours and to give a more worn and vintage look. I also fussy cut out some of the images from the paper as well and layered them on top of the paper.


I used the Distress sprays and paints to put down a layer of white to mute the colourful tones of the paper and to give a wintery feel. I then began to layer on my pieces one at a time, starting with the book paper. I used multi matte medium as my glue and adhered the paper on to a chipboard base to give it stability and dimension.  I then worked on the chipboard and wooden embellishments.  I used some of the Stampendous Frantage Shabby White embossing powder, this stuff is so great, its one of my favorite embossing powders to use!  I first applied a base of the Dylusions paint in red then while it was still wet, I sprinkled on some of the embossing powder.


 I used my heat gun to set the powder and it turned out pretty cool, with lots of sparkle and dimension!
It was then time to add all my goodies to the paper, using the multi matte medium as my glue. I added some "splotches" of white at the end to mimic a worn look and it reminded me of snow.

  Here is my finished piece!  I had fun getting into the Christmas spirit with this layout. I love the tattered and worn look of it and kept with the more traditional colours of this time of year. I also added some Liquid Pearls in Rose Gold down the side of the paper by the Victorian Lady for a final touch.


I hope you have enjoyed my project and will give this type of layout a try.
Thanks so much for stopping by today, and don't forget to check out all the fun goodies in The Crafters' Palette Store and keep up to date with the Designers as well on the Blog
Crafters' Palette Items Used


Monday 30 November 2015

A Happy Houndy Christmas with Laura's Loft

Good morning friends! I am so very excited to share my post and card project today! I am so pleased  to announce I am a full time designer for Laura's Loft!! 

http://www.lauralscott.com

Laura and her team have been so welcoming to me and I just know the next year on this team will be filled with fun, new friendships and happy card making adventures.  My daughter has a
Dachshund, named Pickle, who I lovingly call my Grand-dogger, so she was my inspiration for this card. Here is a peek at the little girl herself.... Miss Pickle.

Now onto my card!
I have used the Holiday Hounds stamp set from Newton's Nook for this card. This is such a fun set to use and you get lots of stamps in the set, along with a few choices of sentiments as well.


I started off with a base of 5 1/2 x 4 1/4 white card stock. I then used the Holiday Hounds stamp set, first I chose my main image, this cute little doxy in a stocking.  Then I used some of the smaller stamps in the set, a bone, heart and snowflakes.

 
I used pigment dye ink in different colours for the background. I created a sort of wreath shape and layered on the different stamps and colours.
I added some blue hearts at the end for a kind of not traditional look and
then added some more of the snowflakes in gold to the bottom of the card to give the impression of snow falling.


 I coloured up my doxy in the stocking with some Spectrum Noir markers and also I used some American Crafts glitter markers as well for the blue stripes on the stocking. I fussy cut out the image and now it was time to put the card together.


 I added a tiny tag and wrote on it with my black micron pen, stamped out the sentiment from the stamp set and popped the puppy and the sentiment up on some dimensional tape.


I added some sequins and bling and also some clear Wink of Stella to the bones and hearts for a final touch!


Thanks so much for stopping by today and don't forget to check out Laura's Store and also keep up with all the fun things on our Blog!

Laura's Loft Products Used

Other Items Used
Colourbox Pigment Ink
Simon Says Pigment Ink
Stayzon Black Ink
Spectrum Noir Markers
Wink of Stella Clear Glitter Pen
Paper From We R Memory Keepers
Sequins and Bling From My Stash
Red Bakers Twine


Thursday 19 November 2015

Mixed Media Canvas for Crafter's Palette - Use Your Stash Challege!

 
Good Morning Crafters' Palette fans, Kim here today and I have a fun share for you featuring lots of goodies from the Crafters' Palette Store.  This month the team is focused on using up what we have in our crafty spaces, off cuts of paper, paints, lace, doo dads, you name it! 
I took this challenge and decided to do up a mixed media canvas with lots of left over bits and bobs from my stash.  I have a photo below of some of the bits I used.
 
 
I am also using some gorgeous Distress sprays for this project, but more on them in a wee bit!


My first order of business is to use up some old book pages a friend sent me, now this would work with any kind of paper you like and there is some great paper selections in the Crafters Palette shop which you can find here, but for this project I used up some of what was in my stash, and these pages fit the bill.  I had no rhyme or reason for where I placed the paper, just add some torn pieces randomly to your canvas. I glued them down with some multi matte medium and then gave them a coat of the same over the top of the paper to ensure they were glued down well.
 
 
Next, it was time to start gluing on my bits and pieces with some silicone glue. I chose to have a focal point in the centre which are some wings that were sent to me over a year ago in a swap I did, I had always been looking for a good place to use them, and this canvas gave me the opportunity to use them. I also have used up off cuts of lace, dominos, buttons, metal clock gears (thanks to my hubby's workshop) wooden gears, left over flowers from a past project, metal keys and finding and even a pen nip (again, thanks to hubby's workshop!).
 
 
Once everything is glued down, its time to get out the Gesso and paint everything white, and by everything, I mean everything!  Fill in all the spaces in between the bits and bobs and make sure it is all covered, this will give your sprays a good surface to cling to, and you will get a truer colour showing from the white background.
 

Now its time for those sprays I mentioned earlier!  Choose what ever colours you wish, Crafters' Palette has a huge range of sprays, I chose the Distress sprays for this project, and went with a cool palette of blues, whites and silver.


 Spray your darkest colour first, and use your Mist-it sprayer filled with water to make the sprays run and get in all the cracks and crevices. Continue to layer on your sprays going from darkest to lightest, dry each layer of colour in between to make sure the colour tones don't come out "muddy".  Keep using your Mist-it as well to make the colour run down the canvas, and don't forget about the sides, top and bottom of the canvas!
 
 
Here is a close up of the items coated with gesso and sprays. Keep layering on until you are happy with the outcome. I added a sentiment to the wings to finish it off.


 I hope you have enjoyed my project today. Don't be afraid to use up all the fun items you have in your crafty space, and even some things you may find elsewhere, it is all useable!
 
 
Thanks so much for stopping by today, and don't forget to check out all the fun goodies in The Crafters' Palette Store and keep up to date with the Designers as well on the Blog.


Thanks for stopping by today!
 

Crafters' Palette Items Used


Tuesday 17 November 2015

Merry Xmas with Rebecca Baer!


Good morning friends, its Tuesday and that means another fun share using my amazing stencils from Rebecca Baer!

I am deep in Christmas card making and decided to do something a little bit different this time, by using a non-Christmas stencil to make a whimsical holiday themed card.  I think its good to look at our stencils in many different ways and see  how we can adapt them to different ways, or in this case a season. So lets get started!

 
I am using the Moroccan Tile & Vine stencil for this card, along with the Artiste Stenciler Brush which works so well for transferring ink to the stencil.  I used three different colours of Distress Ink, Iced Spruce, Salty Ocean and Evergreen Bough.
I started of with the darker colour, Salty Ocean and gently used the Stenciler Brush in circular motions. Then I went to the Evergreen Bough blending it into the first colour, then finally the last and lightest colour, the Iced Spruce. Again, making sure that I blended it all together well. You can see I got a lovely crisp image.

 I took the background and cut it down to 4 1/8 x 5 inches to fit my card and I also die cut some hills, adding a touch of the Iced Spruce to the edges for dimension. I taped them down and then stamped some images out and coloured them, then fussy cut them out....Yes, I cut out those teeny tiny trees!


Once I coloured and cut out the images it was time to put the card together. I popped up the sentiment and the bear and used some multi matte medium to glue down the houses and the trees.

Lastly, I added some white dots to mimic snow and some bling, sequins and some red twine to pick up on the red in the sentiment, and there you have it. A Christmas card using a non traditional image. So take another look at your stencils and see what you can come up with for this holiday season.

I hope you have enjoyed my card today, remember to check out all the fun items in Rebecca's Store and also the DT blog as well.
Thanks for stopping by!

Other Items Used
Distress Inks
American Craft Glitter Markers
Hero Arts Shadow Ink
Paper Smooches Dies
Pinkfresh Studio Christmas Wishes Clear Stamps
Bling, Twine and Sequins From My Stash