Friday 20 December 2013
Saturday 14 December 2013
Shabby Chic Vintage Tag for Gina's Designs Lasercuts Design Team Project
Hi everyone, and Happy Holidays! Kim here today to share with you my Vintage Christmas Tag, featuring our new Super Extra Large Tag from Gina's Designs. Now this tag is so new, its not even available in the store until January 1st, but I was so excited to show you, I just couldn't resist creating something with it!


This tag is 10 Inches in length and 5 inches wide, so it really is Super-Sized, and it's made from a very thick, sturdy chipboard. I was so impressed with how it held up to all my mixed media techniques. I had so much fun making this! I did mod podge, embossing, texture paste, painting, you name it, I did it to this tag! lol

You can see above some of the paper I mod podged onto the tag. I used some vintage music paper, and the gorgeous angel girls are from a napkin, which I peeled apart and placed on the tag. You can also see Gina's hanging clock which is painted and embossed and peeking behind it is one of the Snowflakes from the Snowflake Set and one of the delicate doilies from the Intricate Doily Set.

Above you can see some of the stenciling I did with the texture paste and another Snowflake from the Snowflake Set.

I have used some vintage laces and seam binding from my stash to line along the bottom of the Tag, and you can see more of the Snowflakes and one of the large Open Flourish Frames from Gina's Store as well.

Here you can see a close up of the script stencil I used and also here is a good shot of another new product which will be available soon in Gina's Store, which are the Clock hands made from WOOD! I have embossed them as well and used yet another snowflake behind them with a lovely little satin flower for the center of the clock hands.


On the back of the Tag I have used some Vintage Music Paper and more Laces and Trims from my Stash.

Above here I used a pretty little wood piece from WhichCraft which says "Believe", and some lovely metal wings from Craftsupplies1. They went so well with the vintage and shabby feel of the tag.

Here is another Close up of my favorite pieces, I really love these Snowflakes!! You can do so much with them, and it was fun to experiment with all the chipboard to give them different looks and textures.
Thanks so much for stopping by today, and I hope you will check out Gina's store, and don't forget there is some AMAZING things coming up for 2014!!
Super Extra Large Tag (Coming to the store in January 2014)
Wooden Clock Hands (Coming soon in January 2014)
Other Items used
From my stash: metal key, seam binding, lace,
Metal Snowflake, plastic snowflake, Angel Girls Napkin, music paper lace and satin rosettes from Shabbylishious on Zibbet
Wooden "Believe" tag from WhichCraft on Zibbet
Metal angel wings from Craftsupplies1 on Etsy
Prima Stencils
Texture Paste
Dark Chocolate Truffle Spray from Lindy's Stamp Gang
Monday 9 December 2013
Gina's Designs Lasercuts 500 Facebook Likes GIVEAWAY!!!
Its Giveaway Time
For
Gina's Designs Lasercuts
Gina's Designs is close to having 500 Facebook Likes!! So to celebrate this fact, we are having a Giveaway!
Please go over and click the "Like" button for our Facebook page and you will be entered to WIN a $25.00 Gift Certificate from Gina's Store!
Just CLICK THE BLINKIE to the RIGHT and it will take you to the Facebook Page.
Once we reach 500 Likes we will close this Giveaway, and Gina will pick the winner!
Once we reach 500 Likes we will close this Giveaway, and Gina will pick the winner!
There is lots of great items in store for you to choose from. This is a great opportunity to own some of Gina's amazing items!
Good Luck to everyone who enters!!
Wednesday 4 December 2013
Hello Everyone, I am here today to share my latest project with you! Now that the Holiday Season is upon us, its time to get thinking of some unique gift giving ideas, and this Create Banner by Gina's Designs is definitely one of them!


It was so much fun to make this, and for someone who is creative and crafty this would make a great banner to hang in a craft room or office.

The banner itself comes with 3 parts to each piece, the back piece, the top piece and the individual letters. I have kept the banner in a lovely shabby chic style and used some antique lace, and vintage material to create the flowers you see at each end of the banner.


Below here you can see some of Gina's other pieces I have added here the Steampunk Dressform, which I painted and embossed, keeping in the same vintage colour tones.

Here you can see the letter R, which has the Fashion Cameo in the corner there, which I have altered with some homemade texture paste, paint and the background is stamped and embossed with a script stamp. You also can see a close up of the vintage doily and the antique laces at the top and sides, which are from my stash.

I have used another Fashion Cameo and perfume bottle from Gina's on the letter E, the Perfume bottle is from the Parisian Shape Set.

The last letter in create, is this E, and again, I have used a few more pieces of the great chipboard pieces from Gina's. The Eiffel Tower you can see done in the same style as the Dressforms. With paint and embossing powder, you can really change the look of these pieces. The Fleur De Lis at the top centre here is painted white and embossed with white glitter. I have also added one of my handmade flowers, the rolled rose on the right hand side, with a little paper flower in the middle.

Here is another of my handmade flowers, I have used some vintage muslin to create this and then added a flower to the centre and some seam binding in a beige tone. There is one of these flowers at each end of the banner

Here is a close up of one of the Fashion Cameos I altered, I really love these, they really add a vintage flair to a project.

Below here is one of Gina's Words and Phrases 1 Set, the word Dream is covered in some texture paste and I used some distress ink around the edges and added a bit of glitter to it to make it shine.

And finally here is another of my favorite pieces, it is the Penny Farthing, Antique Bike set, I really love these bikes they are so much fun to alter, and I have continued the same look on this with the paint and embossing powder.

I really hope you like my project today, it was a lot of fun to "create" and I am sending this off as a gift to a friend, so I am excited for her to receive it. Thanks for stopping by!
Items used from Gina's Designs
Other items used in this Project
Martha Stewart Paint "Putty"
Ranger Embossing Powders
Wild Orchid Craft Flowers
Wood Sentiments from my Stash
Vintage and Antique laces and trims from my stash
Butterbeescraps Metal Filigree Pieces
Tim Holtz Distress Inks Frayed Burlap & Vintage Photo
Sunday 10 November 2013
Memory Tray Shadowbox
Design Team Project for Gina's Designs Lasercuts
Hello everyone today I would like to share with you this wonderful Memory Tray Shadowbox by Gina's Designs. I really love this shadowbox, it is so easy to put together, just click into place and it only took me a couple of minutes to do it. I have used some of the Graphic 45 paper, The twelve Days of Christmas for this.

Here you can also see some of the other great goodies from Gina's, the Lamp Post is from the Christmas Shape Set and the Snowflake Shape Set you will see on the project worked out great. I have just covered them in my homemade texture paste to give them a snowy type of look.

I really love all the compartments in the shadowbox, it gives you lots of opportunity to embellish. Here you can see in this part one of the little chipboard snowflakes in the frame with a little white flower in the centre.


Here is part of the snowflake shape set, it is the border, I cut it down to fit on this section of the Shadowbox, and again used my texture paste, it made a great border for this part of the box and picked up on the Christmas/winter theme of the project.


Here you can see the Hanging clock from Gina's store, this is always one of my favorite pieces, it adds a great touch attached to the side of the shadowbox. I have backed it with more of the G45 paper to show off the roman numerals on the clock.

And Finally here is a full view of the Shadowbox, its so great to have this little keepsake for this coming Christmas. You can certainly embellish this in so many ways, the compartments would be great for family photos too!

Thanks so much for taking a peek at my project today! I had a blast making this and please take a peek at Gina's store to find all these great items and more!
Items used from Gina's Store
Other items used
Graphic 45 Twelve Days of Christmas Paper Stack
Wild Orchid Craft Flowers
Tim Holtz Metal Numbers & Tag Sentiment
ButterBeeScraps Metal Embellishments
Prima Resin Wing
Sunday 3 November 2013
Paris Theme Shadowbox by Kim
Gina's Designs DT Project
Paris Shadowbox

Hello Everyone, Kim here, and today I want to share with you Gina's Paris Theme Shadowbox. I had so much fun with this piece! These themed shadowboxes are great because they are simple to put together and come with lots of fun embellishments to alter as well. These boxes would make great quick gifts to give for birthdays or any occasion.
You can see I have done this in a vintage style and kept the colours in neutral tones of white, cream, taupe and a bit of brown.

I have used the PaperHouse European Travel paper stack on this project, and also mixed it with some vintage music paper from my stash, they went well together and kept it in the vintage neutral tones I was after. Below here you can see I created a skirt for the dress form that comes with this kit, by accordion folding the music paper and attaching it with some vintage seam binding.

I also tore up some of the papers and music notes and distressed them to give an even more shabby vintage feel.

I used a crackle medium on the outside of the shadowbox and on the top as well, then gave it a spray with Dark Chocolate Truffle from Lindy's Stamp Gang.

For the embellishments, I created this look by using the same spray from Lindys' and then using my Inka Gold I rubbed some of the Old Gold and Old Silver on top of the pieces, it gave them a lovely sheen.

Here is another of the embellishments you get with the kit, a Fleur de Lis, with the same treatment as the other pieces, I attached a metal key from my stash with some Wild Orchid Craft flowers.


I hope you like my project, it was a blast making it! Thanks for stopping by the blog today, and don't forget to check out Gina's Shop for these themed shadowboxes they come in lots of different styles!
Thanks!
Items used from Gina's
Other items used
Paperhouse European Travel Paper Stack
ButterBeeScraps Metal Piece
Wild Orchid Crafts Flowers
Lindy's Stamp Gang Sprays
Vintage Laces and Seam Binding from my Stash
Vintage Music Paper from my Stash
Metal Key, Crown and Scissors from my Stash
Monday 21 October 2013
Vintage Shabby Chic Camera Box
Hi Everyone, its Kim here today to share with you this lovely Vintage Shabby Chic Camera Box I have created. When I saw this box in Gina's Shop, I knew I had to have it. I have a family of photographers and I really wanted to create this for someone special in my family.
I had so much fun altering this, and I decided to keep it in the white, creams, and black tones.

I have used several of Gina's other Chippys, including the Film strip, arrow, and frame around the view finder all from the "Say Cheese" set, along with the cogs and gears, and steampunk doily which you will see is behind the "lens" of the camera!

The lid lifts off to reveal the shabby chic interior, I have used some vintage laces down either side of the box, which I also painted with some white acrylic paint, then sanded it down to give it more of a vintage look.

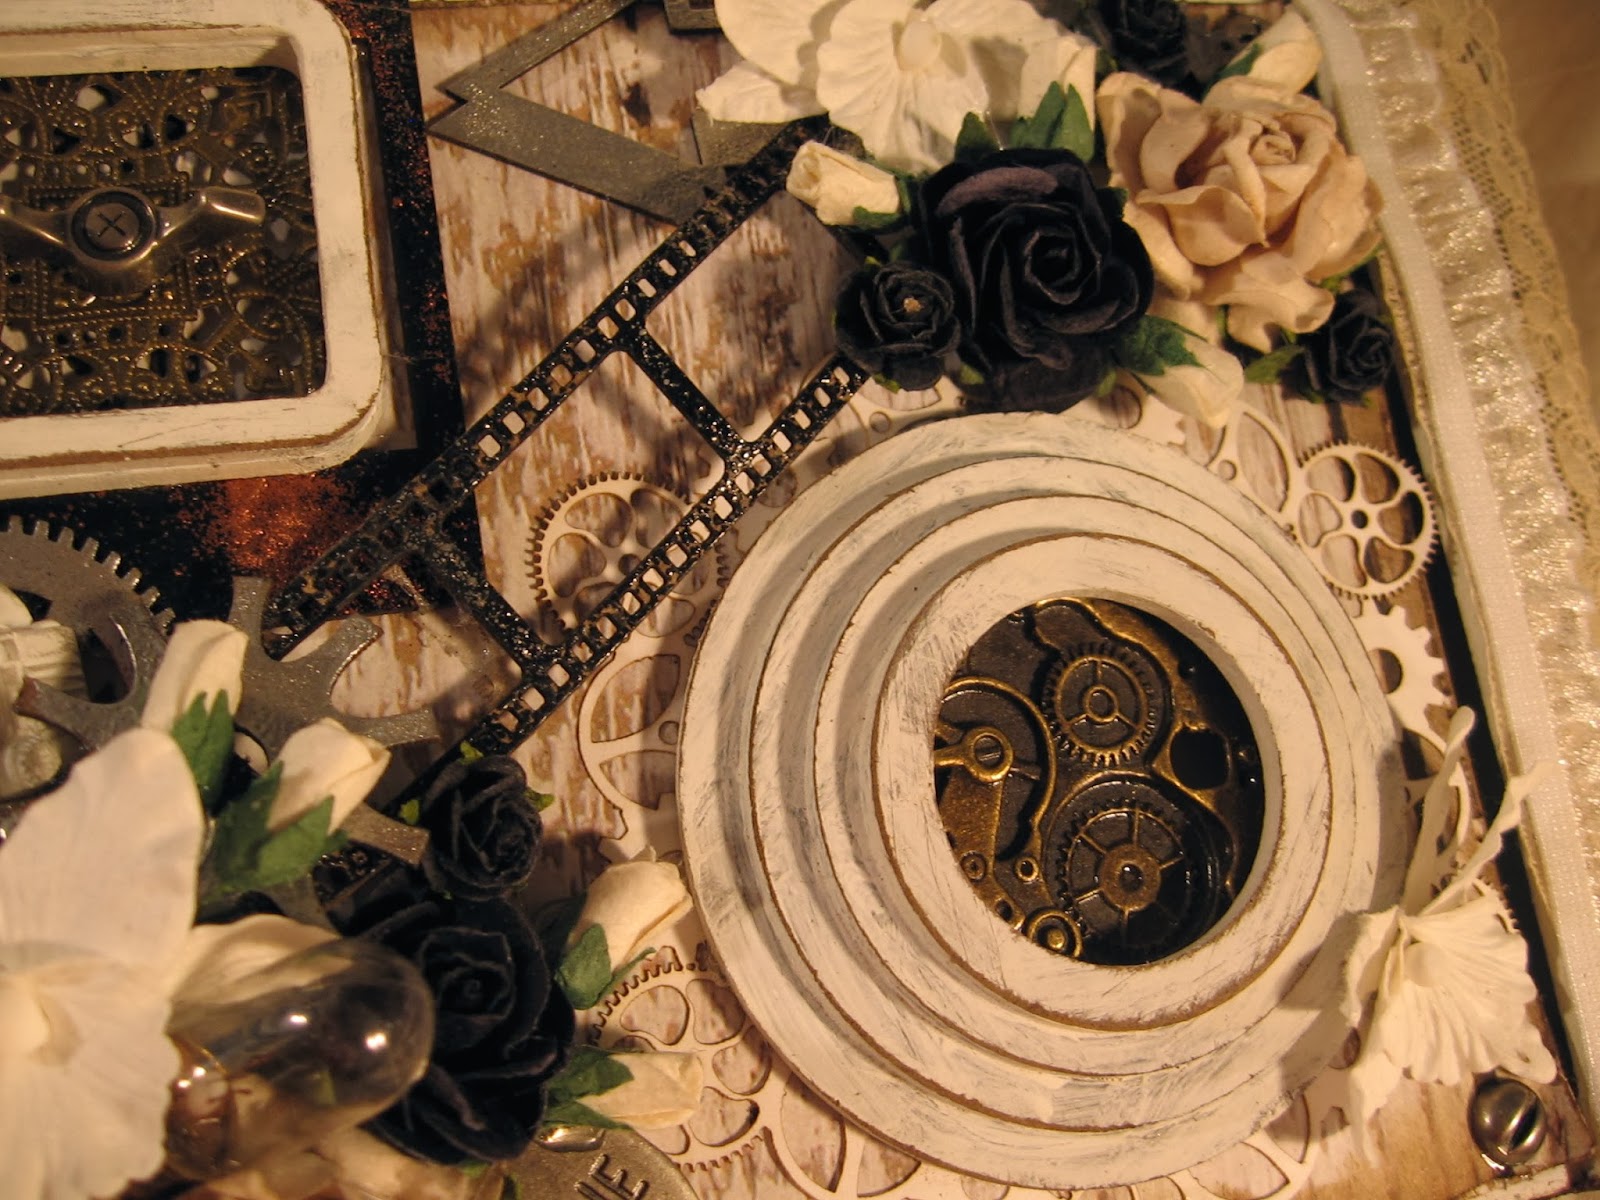
Here is a side view of the box, you can see its unique construction, creatively imagined by Gina to resemble an old vintage Camera!

Front view of the box, you can see it is very dimensional and the lens which is made of wood really stands out!

Thanks so much for stopping by and I hope you like what I have created for you today.
Gina's items used:
Other items used:
Kaisercraft Basecoat Paper
Metal Pieces by ButterBeeScraps
Flowers from Wild Orchid Crafts
Prima Junkyard Findings & Resin Camera Piece
Tim Holtz Imagine Tag
Wednesday 16 October 2013
Design Team Project for Kitty's Scrap Post on Zibbet "Typography"
Typography Altered Box
Happy Wednesday Everyone! I hope you are all having a great week! Today I would like to share with you an altered Box I created using the Embellishment kits from Kitty's Scrap Post
I created this box also using the New Graphic45 paper "Typography". I really adore this paper, and if you haven't seen it yet, I do recommend you check it out. It is super cool, and fun to work with!

Here you can see the front of the box and the lovely tan, browns and orange tones in the paper. I have used Luisa's trims from her Embellishment kits on the box, here you can see the gorgeous brown lace on top of the beautiful white pleated trim. I have added a Prima trinket and some metal filigree pieces to add a finishing touch.

Here are some of the beautiful laces and flowers you can find in the KSP kits, they really went well with this G45 paper!

On the top here, I have used a Chipboard Gate from Gina's Designs, and done some texturing with it using Lindy's Stamp Gang Sprays and my home made texture paste. In the corner you can see more of the beautiful flowers Luisa has in the kits!

Side View of Box


So please do stop by Kitty's Scrap Post and check out these beautiful kits and also remember Luisa sells gorgeous digital scrapbooking kits as well!!
I hope you have found a little bit of inspiration here today, please feel free to comment or subscribe to my blog. I love to hear from you!
Thanks for stopping by!
hugs, Kim :)
Subscribe to:
Posts (Atom)