Showing posts with label Stencil. Show all posts

Tuesday, 25 June 2019

Dot Mandela Art Journal Page White Rose Crafts DT


Good morning friends, Kim here with my next DT project for White Rose Crafts.
This time I have created an art journal page and made some fun dot mandela's on the page, and on this gorgeous dreamcatcher chipboard piece from the WRC Store.


I started off painting my page with some black gesso, then I got out my Studio Light Stencil from the WRC Store. I used my white chalk pencil to trace the stencil on the background. This enabled me to be able to follow the lines and use my dotting tools to create a pattern. Here is a photo of the stencil so you can see.


Once I was finished the background dotting, I got out this beautiful chipboard piece of a Dreamcatcher and painted it with white gesso. I then embellished it with more of the dots, using different sizes of the dotting tools.


I dotted around the dreamcatcher as well, as once I get going dotting, I can't seem to stop myself!


I added some Tim Holtz Sentiments to finish off my page.


Once again, here is the finished page. I love the striking colours against the black backdrop, and using the Studio Light Stencil made it easy to create fun mandela shapes.


Thanks for stopping by today, I hope you have found some inspiration here.


Friday, 15 July 2016

Reach For The Stars Art Journal Page Joggles DT

 Good morning friends, Kim here today to share my art journal page I created for Joggles Design Team!
I had so much fun with this page, it was really a step outside of what I normally do, but I really enjoyed making it, so let's get started!
 
 
Here is a list of supplies you will need to recreate this page :
 
 
Black Card Stock
Prima Art Alchemy Paints Ancient Coin and Gold Rush
Elizabeth Crafts Design Balloon Dies
Script Stamp
Blank Ink for Stamping
 
I started off creating an ombre effect with the Dylusions paint. I used a baby wipe, and these paints go on so easy this way, it is a super fast way to start your back ground!
 

I started at the top of the page with the darkest colour, then went to the next colour tone, blending them as I went. I finished off the bottom of the page with the white paint and blended back upwards to give a smooth look to the page.
 
 
Next, I got out my Love Twist Stencil and again used a baby wipe to put some paint on the page. I didn't want the paint to be too heavy and using a baby wipe, I was able to achieve this.


Once the paint was dry I went around the hearts with a White Sharpie Fine Tip Marker to give them more definition.  I also stamped around the edge of the page with the Grunge Stars Border Stamp in a matching blue colour, and defined the stars with the white sharpie as well.


Now it was time to play with some Sticky Snippets! I really love these, they are plain labels in a variety of shapes and also in letters, and you can do any mixed media technique on them you wish. Once you have the desired colours and effect on them you can just peel off the shaped labels and add them to your projects as you wish. I did my Sticky Snippets, using the small stars set, in some yellow distress spray and some gold paint. I just dabbed here and there with the paint and then splattered some white gesso all over the page.


Once you peel off the labels you have your shapes and your mixed media technique! Below here you an see how the stars turned out, not bad if I do say so myself!

 
I gave the same technique to the Sticky Snippet Alpha's and mounted them on black cardstock to make a more dramatic effect.
 

 Now it is time to die cut out some fun balloon shapes for our little fella to hold.  I used three colours of Distress Inks for this, and shaded one side a bit darker than the other, to give the illusion of light and dimension.
 
 
I glued down the balloons in a nice pattern, and added some strings with my black micron pen. I also got out the white sharpie again and added some highlights to one side of the balloons.


Now its time to work on See-More! I love this stamp he is so much fun and although I had to snip off this big thumb (Sorry See-More!) to make it look like he was holding the balloons, I promise he didn't feel a thing. I coloured him in using my Spectrum Noir Markers in various colours until I was happy with this colour tones and funky hair.


I glued him down and added some loopy lines to make them look like balloon strings. I then added a star to the bottom of his feet to make it look like he was standing on the point of a star.


I doodled around the stars, hearts and some of the white gesso splatters for interest, and also stamped around the page with a script stamp from my stash in black ink.


Here is the finished page. I love this page, it makes me smile, and I had so much fun creating with the Sticky Snippets. I know I will be using these on lots of my projects!


Thanks so much for stopping by today, and please check out all the great things Joggles has in their store!


Tuesday, 3 November 2015

Winter Wishes DT Project for Rebecca Baer

Good Morning crafty friends! Today I am sharing my DT project for Rebecca Baer.  I have started on creating my Christmas Cards for this year, and Rebecca has some perfect stencils for this time of year!
 
I did a double layering technique with this card, using the Petite Diamond Plaid Stencil first. This is  a fun stencil, there is three parts to it, and you layer on one stencil at a time. I decided to go with  holiday themed colours in my card.
 
 
Here is the background so far...
 
Next I used the Snowflake Masque Stencil and some embossing paste, which is like a light texture paste and spread it all over the top of the background. 


 Once that was completed all over the card, I got out some holographic embossing powder and sprinkled it on top of the wet texture paste.   I then heat set it with my heat gun, and  the effect shown above, is dimensional and very snowy  and sparkly looking!
 
 
Now it is time for some die cutting, I used a Winter sentiment and some snowflakes which I coloured with Festive Berries Distress ink.  I used my glossy accents to glue it all down. You need a strong wet glue to make the pieces adhere to the texture on the card.
 

I added some sequins and glitter for some finishing touches to the card.
I hope you have been inspired to create a snowy card yourself and will give this layering technique a try.
Thanks for stopping by today!


Other Products Used
Tim Holtz Distress Inks
Wendy Vecchi Embossing Paste
Glossy Accents
Holographic Embossing Powder by Ranger
Sizzix Dies
Sequins From My Stash


Tuesday, 20 October 2015

Rebecca Baer Design Team Hello Card


Good morning and happy Tuesday! Today I have a fun and easy card to share with you featuring the Diamond Weave Petite Stencil from Rebecca Baer.
 
 
At first glance, this card may seem like its a lot of work but I can assure you in a few simple steps you can make a card that will look like you took hours to make!
This is a 5 1/2 x 4 1/4 card.
 

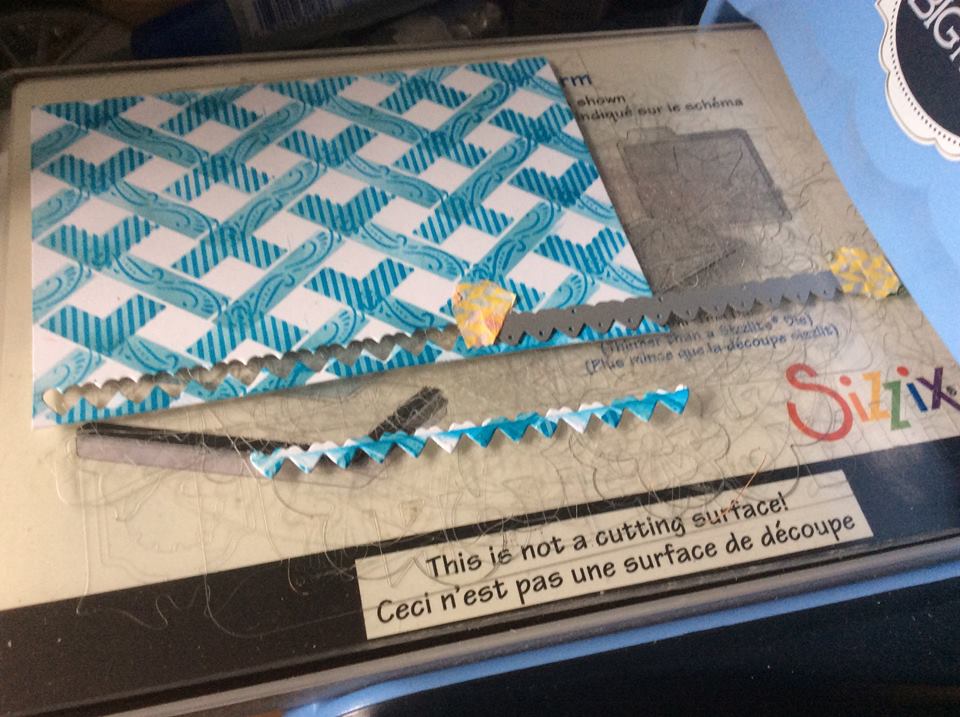
 The first step was getting out the diamond weave stencil and my distress inks.  This stencil is great and you can get so many different designs from it, I just started on one side of the card and worked my way over to the other side. Overlapping the stencil gave a lattice look which I was really please with.

 
The next step is to take a darker Distress Ink in the same colour family and use the lattice part with the flourishes and lines on. Again starting at one side and working your way over gently put your ink on and the impression will be on top of the lighter coloured lattice.


After I was finished with the stencilling, I got out my heart die and ran it through my Big Kick to create a row of hearts across the lower part of the cardstock.
 

I used the same die cut to cut out some more hearts in some fun colours.  I cut the hearts into pieces and added two at a time and created a row across the lower part of the card with the die cuts insetting them in to the part I cut out.


I also used a fun Hello die from Spellbinders and die cut that three times so I could layer the die cuts in a staggered pattern to create dimension. Now its time to put it all together.


You can see here a close up of the hearts, and also the Hello sentiment, I love the staggered look of the die against the lovely lattice background.


I mounted it on some navy card stock, and added a few fun sequins for finishing touches.


I hope you have enjoyed my card today, remember to check out all the fun  items in Rebecca's Store and also the DT blog as well.
Thanks for stopping by!
 
Rebecca Baer Stencil Used
 
Other Items Used
Spellbinders Hello Die
Paper Smooches Heart die
Recollections Card Stock
Distress Ink From Ranger

Tuesday, 6 October 2015

My Friend Owl A Rebecca Baer DT Project


Good morning friends and happy Tuesday. Kim here today to share with you a fun card project using the Petite Diamond Plaid stencil from Rebecca Baer. I created this 4 1/2 x 5 1/2'' card using white card stock as the base. 
 I love fall, and was inspired by the season, but also by a dear friend who loves green and owls. I will be sending this card to her for a little thank you. I started off with white card stock and die cut a leaf image out of the blank card, I set it aside to use later.
 
I started off with layering on the Petite Diamond Plaid stencil. This stencil comes with three layers. I love working with layers it gives such a great opportunity for dimension and colour.  There is no right or wrong way to layer up this stencil so I just laid one on top of the other, using my Distress Inks in  three different tones.
Once the plaid design was achieved. I got the die cut leaf out and stamped and inked up a cute little owl. I added some stamped pine cones in the background as well.
 
 
I popped up the plaid piece with black foam tape and mounted it on some chestnut brown card stock from Recollections. Once the plaid piece was in place I used score tape to tape down the leaf and inserted it into the card. By layering on the plaid and not the leaf it gave it some more dimension to the card.
 
Lastly I die cut out the word friend and added some bakers twine and a small flower embellishment.


 Here is the finished product! I love how it came out, and this stencil is fun and versatile, so watch for me to use it again soon, it has become one of my favorites!
 
I hope you enjoyed my project today and will check out all the great items in Rebecca's Store and also the DT blog as well.
Thanks for stopping by!
 
Rebecca Baer Products Used
 
Petite Diamond Plaid Stencil
 
Other Items Used
Cardstock from Recollections
Inkadinkadoo Owl Stamp
Paper Smooches Friend Die
Recollections Flowers
Spectrum Noir Markers
Distress Inks
Kool Tak Black Foam Adhesive


Tuesday, 18 August 2015

2 Cards 1 Stencil DT Project for RebeeccaBaer.com

 
 Good morning friends and happy Tuesday. Kim here today to share with you two fun card projects using the same stencil.  Its amazing that you can get two different looks with basically the same stencil and embellishments. I have used opposite colours of pink and blue distress inks for these 4 1/4 x 5 1/2'' cards.
 
I used the Fleur De Lis Stencil from Rebecca's Store, and taped it down to my white cardstock with some of the mini masking tape that can also be found in Rebecca's Shop.   I used some pink tones in the distress inks and started off with the lightest colour, and gradually moved down the page until I got to the darkest tone.


I ended up using some Simon Says Stamp ink for the final row as I wanted it to be very dark in comparison to the first light row. 


Next I used my die cuts that I had ready. I used the Eiffel Tower and embossed it with two different tones of embossing powder, one in a pewter, and one a verdigris tone to pick up on the metallic look. I die cut out the "hello" sentiment and stamped on top of it with my script stamp and then adhered it to some bright pink cardstock, creating a dovetail at the end of the banner.
 
 
 I stamped a postal image on top and added some sequins and pearls for a final touch.
 
 
For the second card, I used the same stencil, but reversed the way I used it. This time I put my blue tones of inks down first, creating a faux ombre effect going from lightest to darkest.


Next, I taped the stencil down again and got out a baby wipe and rubbed over the stencil removing some of the inks. Note, that this will only work with water based inks, and not with dye or pigment inks.   When I removed the stencil I was left with a lovely shadowy effect and the Fleur De Lis appears lighter than the inks.
 

I used the same die cut Eiffel Tower, and a different script sentiment. I embossed them with some embossing powder, and again, added the stamp, some sequins and bling to finish it off .

 
Here are the two finished cards, side by side. You can see what a fun difference you can get using one stencil for two different cards.


I hope you enjoyed my project today, thanks so much for stopping by and don't forget to check out Rebecca's Store and Blog for more info!
 
 
Other Products Used
Lindy's Stamp Gang Embossing Powder
Ranger Embossing Powder
Prima Stamp
Doodlebug Designs Sequins
Anita's Brand Pearls
Distress Inks
Simon Says Stamps Doll Pink Ink
Multi Matte Medium
Die Versions Dies
Die-Namics Dies