Tuesday, 15 September 2015

How To Create a Stenciled Window Die Cut Card for Rebecca Baer Design Team

Hi friends, today I have a fun die cut window card to share with you all.  This was my first try at creating a window card, but I am please with the results. I hope you will be too!  I was totally inspired by Jennifer McGuire on this project, I have posted a link to her inspiration video at the bottom of the post.
 
I created this 4 1/2 x 5 1/2'' card using white card stock as the base. I got out the Flight of Fancy Stencil from Rebecca's Store and the larger Artiste Stenciler Brush to apply my Distress inks.
 
 
I taped down the stencil with the RB Mini Masking Tape to ensure that my stencil wouldn't move as I wanted a nice crisp image.   I applied several layers of the ink and
 
 
Once that was completed it was time to die cut. I used my inked piece and used more of the RB Masking Tape to hold down my die, (this stuff is invaluable to me now, I just love it) and ran it through my Big Kick.
 
 
I cut out the circle first with my circular die and then cut the word out of the circle, I just found it easier this way.
 
 
Once I had the circle and the word cut out, I used more of the tape to hold the top half of the circle in place and then attached the word across the middle of the tape. I wanted to make sure I had the pattern lined up on the card as well so it was an easy way to ensure I had the word lined up.
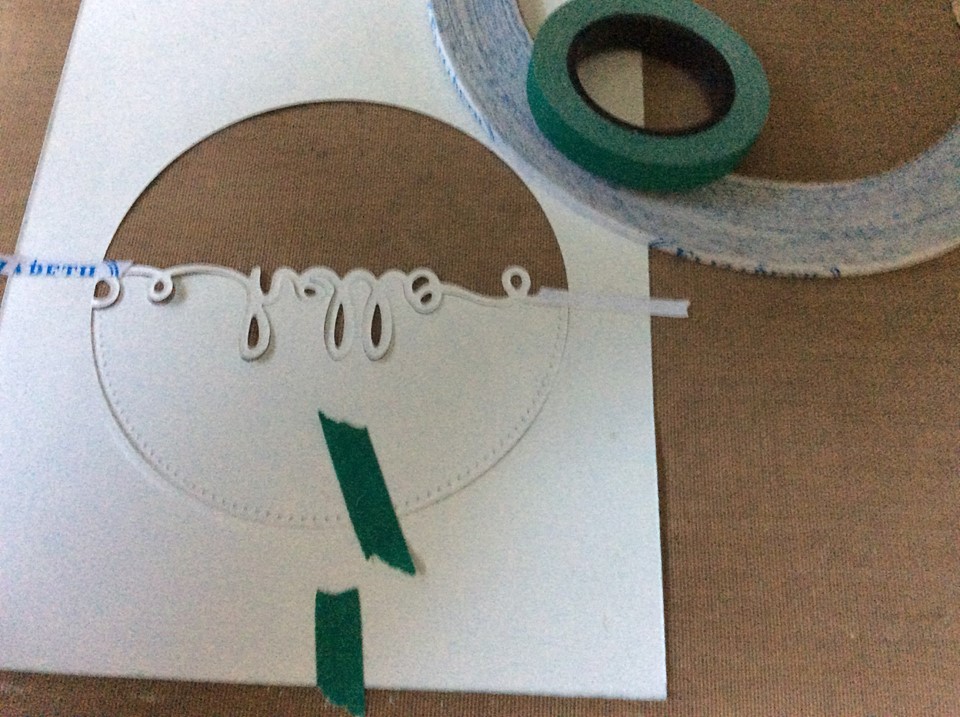
 
 
 Now that this part was ready I added some foam tape to pop this part of the card up and set it aside.


Once that was completed I got out my second piece of card stock and used my embossing paste and the same stencil to create some texture on it.
 
 
I lined up the patterns from the embossing paste card and the Inked up card to ensure the patterns matched, I wanted it to look like one continuous pattern on the card. The die cut hello just floats nicely in the middle, I added a tiny bit of clear foam tape for some stability on the back of it, and some silver sequins to finish it off.


This card does have a lot of steps to it, but I felt it was worth it for the fun look I got.

 
Also, this card created an extra circle die cut, and I used it and the tiny die cut pieces to create a small note card to go along with this card.

 
I hope you enjoyed my project today and will check out all the great items in Rebecca's Store and also the DT blog as well.
Thanks for stopping by!


Other Items Used
Evergreen Bough Distress Ink
Sizzix Hello Die
Die-Versions Circle Die
Wendy Vecchi Embossing Paste
Doodle Bug Designs Sequins
Big Kick Machine
 
Jennifer McGuire's Inspiration Video


Tuesday, 1 September 2015

The Sky is the Limit! DT Project for Rebecca Baer

Good morning and happy Tuesday friends. Today I am sharing a fun DT project for Rebecca Baer. I was eyeing my stencils I had from Rebecca and was thinking what other ways I could use them.  I like to get lots of mileage out of my crafty tools and I think this technique will allow you to look at your stencils in a completely different light.
 
I started off with the Flights of Fancy stencil I wanted to create a fun and whimsical sky look and I thought that just using a portion of the stencil in a repeating pattern would be good for this. I used the circle images on the stencil with different colours of Distress Inks, moving the stencil over and over on the cardstock.


I used the RB Mini Masking Tape to hold down the stencil, this is great tape, and allows you to move the stencil easily over the page while retaining its sticky-ness!  I also used the RB Artiste Stenciller Brush to add the ink, I really love these brushes they flow smoothly on the cardstock and don't seep under the stencil.


I used three different shades of blues in the Distress Inks and continued to move the stencil over the page, overlapping the circles and also leaving some negative white space in the background. 
 
Here is a look at the finished background. I also think this stencil would be good for creating a chain look as well....so that might be on the agenda for another project coming up soon!


 Now its time to add some fun die cuts. I am using a hot air balloon theme on here I thought it would go great with the background. This die set also comes with a matching stamp set, so once the dies were cut I could stamp the image on top and then just colour them in.


Here are some of my die cuts......


I added some glitter to the clouds and banner on the hot air balloon and popped up some of the stars to add dimension. I also added a few fun sequins for sparkle.
 
I matted the 6 x 6 card with some coordinating cardstock, added my sentiment and now it's ready to send to a friend.
 
 
I love that I was able to completely create a different background with a stencil I have used often, this really made me look at all my stencils in a new light!
 
Thanks for stopping by today and don't forget to check out Rebecca's Store and the DT Blog for lots of fun and exciting info!


Other Items Used
Lawn Fawn Blue Skies Die Set
Lawn Fawn Blue Skies Stamp Set
Evergreen Bough, Stormy Sky and Broken China Distress Inks
Spectrum Noir Markers
Doodle Bug Design Sequins
Wink of Stella Glitter Pen


Tuesday, 18 August 2015

2 Cards 1 Stencil DT Project for RebeeccaBaer.com

 
 Good morning friends and happy Tuesday. Kim here today to share with you two fun card projects using the same stencil.  Its amazing that you can get two different looks with basically the same stencil and embellishments. I have used opposite colours of pink and blue distress inks for these 4 1/4 x 5 1/2'' cards.
 
I used the Fleur De Lis Stencil from Rebecca's Store, and taped it down to my white cardstock with some of the mini masking tape that can also be found in Rebecca's Shop.   I used some pink tones in the distress inks and started off with the lightest colour, and gradually moved down the page until I got to the darkest tone.


I ended up using some Simon Says Stamp ink for the final row as I wanted it to be very dark in comparison to the first light row. 


Next I used my die cuts that I had ready. I used the Eiffel Tower and embossed it with two different tones of embossing powder, one in a pewter, and one a verdigris tone to pick up on the metallic look. I die cut out the "hello" sentiment and stamped on top of it with my script stamp and then adhered it to some bright pink cardstock, creating a dovetail at the end of the banner.
 
 
 I stamped a postal image on top and added some sequins and pearls for a final touch.
 
 
For the second card, I used the same stencil, but reversed the way I used it. This time I put my blue tones of inks down first, creating a faux ombre effect going from lightest to darkest.


Next, I taped the stencil down again and got out a baby wipe and rubbed over the stencil removing some of the inks. Note, that this will only work with water based inks, and not with dye or pigment inks.   When I removed the stencil I was left with a lovely shadowy effect and the Fleur De Lis appears lighter than the inks.
 

I used the same die cut Eiffel Tower, and a different script sentiment. I embossed them with some embossing powder, and again, added the stamp, some sequins and bling to finish it off .

 
Here are the two finished cards, side by side. You can see what a fun difference you can get using one stencil for two different cards.


I hope you enjoyed my project today, thanks so much for stopping by and don't forget to check out Rebecca's Store and Blog for more info!
 
 
Other Products Used
Lindy's Stamp Gang Embossing Powder
Ranger Embossing Powder
Prima Stamp
Doodlebug Designs Sequins
Anita's Brand Pearls
Distress Inks
Simon Says Stamps Doll Pink Ink
Multi Matte Medium
Die Versions Dies
Die-Namics Dies


Thursday, 13 August 2015

Tea Time with Spectrum Noir

Good morning friends, today I have a fun share for you. I created this card specifically for the challenge over on the Spectrum Noir Blog.  This month the challenge is "Anything Goes!", so I thought I would dive in and have a go.
 
 
I am so enjoying playing with my Spectrum Noir Markers, I have had them for a while and been practicing behind the scenes with them. I feel a bit more confidant with them now, and have been watching lots of video tutorials!
 
I used one of my Prima Bloom Girl stamps for this 5 1/2 x 4 1/4'' card, I love these stamps, and they offer lots of real estate for colouring too!
 
I wanted her to be bright and vibrant so I used a great variety of Spectrum Noir colours.
 
 
Here is a close up of her face. I had fun making the skin tones, again I am a beginner, but I wanted her to look very soft against the bold colours I used around her. I did some shading with FS2 and PP1 was used for a bit of light blush on her cheeks. I used TB1 for her eye colour.

 
The finishing touches are some white Sharpie pen dots and a few pieces of bling here and there to add more dimension. I added a small "thanks" sentiment and matted it all on some DCWV dark purple cardstock.
I hope you like my card for today, and don't forget to check out the challenge over on the Spectrum Noir Blog!
 
 
Here Is A Complete List Of The Spectrum Noir Colours I Used
Face: FS2, FS3, PP1
Hair: TN2, TN7, EB2, EB5
Eyes: TB1
Red Flowers: DR1, DR3. DR5, DR7
Blue Flowers: TB1, TB2, TB3
Purple Flowers: LV2, LV3
Orange Flower Centres: CR10
Pink Flower Centres: BP6
Green Leaves and Flowers: CG1, CG2, DG2, DG3, DG4
Colourless Blender Marker
 
Other Products Used
Prima Bloom Girl Stamp
White Sharpie Pen
Anita's Brand Bling
DCWV Cardstock
Lawn Fawn Thanks Stamp


Tuesday, 4 August 2015

Stencilled Zentangle ATC's for Rebecca Baer

Good morning friends, Kim here today to share with you some fun Zentangle inspired ATC's.
 
 
I had lots of fun with this project, I love making ATC's and I have been practicing doing Zentangle for a while, and thought this might be a good and easy way to help others who are new to this type of art. I thought that using layered stencils would be a fun and easy way to get the look of Zentangle but not do all the work.
 
I started off with the Artist Tool stencil and my Faber Castel black Pitt Pen and I traced around the outline of the palette.  Next, I got out the Harlequin Damask stencil, and traced out a spot I liked on the stencil into the middle of the palette. In the photo on the bottom right you can see what it looked like.
 
 
Now its time for colour. I used some Hero Arts Inks and my water brush and moved the inks around on the paper. You can see on the photo below on the right how it came out.
 
 
 I also did a second one with a different part of the Harlequin Damask stencil to achieve a different pattern on the second one.  Once I had them both coloured it was time to start the Zentangle  process. Now I am no expert, but I love how this stencil technique cut my work down to fill in the palette. I just started to doodle and fill in the blank spaces with lines, dots, squiggles and waves.


I kept going until I was happy with the outcome.


I decided to fussy cut out one of the palettes, and glue it down to some black ATC matte board. I love the look of the black for the background. 


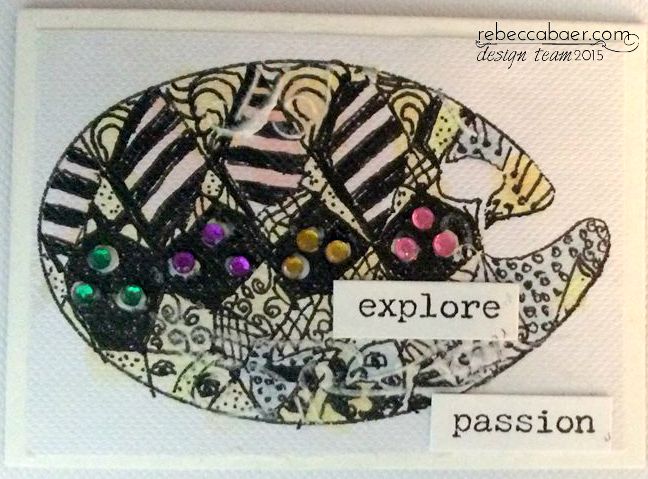
For the second one I just trimmed down the paper and then added some tiny gemstones and a sentiment from my ATC Stash.
 
 
You can see the difference in contrast from the black to the white backgrounds.
 
I added some white embossing paste to this one as well, using the Artist Tool Stencil once again to add texture and some images of the brushes.
 
I hope you will give this technique a try, I really enjoyed it, and I feel its good for a beginner Zentangl-er like me to use stencils to help the process along. Remember, it doesn't have to be perfect, just have fun!
 
Thanks for stopping by and don't forget to check out Rebecca's Store and links below!


Other Products Used
Faber Castel Pitt Pen Black
Inks from Hero Arts
Pentel Water Brush
Rhinestones from my stash
Black ATC Cards from The ATC Store
Crescent Mixed Media collage ATC Cards
Ranger Multi Matte Medium